Sunday, 17 July 2022

How Do They Keep Doing This?

Latest releases from Pelikan
Having received the new puzzles from Jakub and Jaroslav, they promptly went on holiday and I thought I might have had plenty of time to solve and write about all these wonderful new designs. Oh boy, I was very wrong. Even whilst on holiday (vacation to the yanks) they still think about all their devoted puzzle friends and sent me a message asking if I could have a review to them before Friday 15th. OMG! The pressure is on! I really went for it. This was not made particularly easy by the fact that there are several difficult packing puzzles this time and I am terrible at packing puzzles. Many of you will have read my reviews when they went up on the Pelikan store describing the puzzles - if you have then no need to read on. I just didn't have time to publish the reviews with decent photos here until now. 

I have not managed to solve them all but I certainly have a review on them all for you and hope that this helps when you are choosing what you should buy. Without further ado, on to the puzzles:

Typhoon S1

Typhoon S1 by Osanori Yamamoto
I absolutely love this particular subgroup of the interlocking/caged burr puzzle. A lot of the high piece number caged burrs can be extremely difficult and quite a few have completely beaten me. There are a small group consisting of a frame with just 4 burrsticks sitting inside that I really enjoy the process of exploration and disassembly. The reassembly is a challenge but definitely possible with such a low number of pieces. 
Galaxy
Galaxy Z
Mysterious Galaxy
The master of this type is Osanori Yamamoto who began my love of these with the incredible Galaxy, Galaxy Z and Mysterious Galaxy puzzles. This kind of puzzle can be expanded to make them more difficult and maybe slightly more interesting (as Dan Fast did with the Stir the Coffee puzzle in the last release. Osanori has designed a lovely little challenge here which Jakub and Jaroslav have brought into the world beautifully using Jatoba and Wenge. The fit is perfect and the exploration is great fun. There are quite a few short blind ends and it's possible to go in a loop. I got stuck at one point and could not find the critical move - everything is visible as you progress but due to the ends being at 90º to each other I found my moves were easily blocked. After a couple of evenings of play I suddenly found my hidden move and I was able to take out the first piece. 
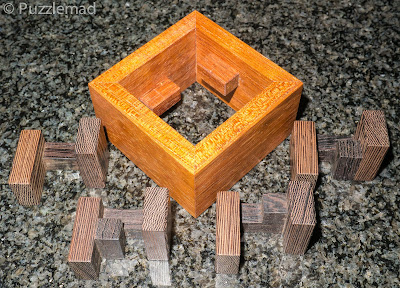
It's a fun reassembly too
Having disassembled it, I scrambled the pieces and attempted reassembly and really struggled. I did manage to work out what went where and in what order but the hidden move that I had found fro the disassembly was also hidden on the way back to the beginning. Brilliant puzzle which is just the right level of difficulty and beautifully made.

Insider

Insider by Alexander Magayarics
Pelikan will be sending these as disassembled puzzles
This absolutely stunning puzzle designed by Alexander Magyarics was sent out to me fully assembled. I suspect this was done to prevent the captive piece rattling around in the post and getting damaged. If Pelikan does decide to send it out assembled then I would very much suggest that you get your significant other puzzler in your life to take it apart for you and then you treat it as an assembly puzzle. It is truly gorgeous having been made from Zebrano and Jatoba - the grain is just stunning! It is also a substantial puzzle in your hands being an 8cm cube. This size is very welcome so that you can easily get your fingers inside to manipulate the pieces. There are 3 pieces and the box which has some pretty big holes in it. Only 2 of those pieces can be removed and the other has to remain inside. 
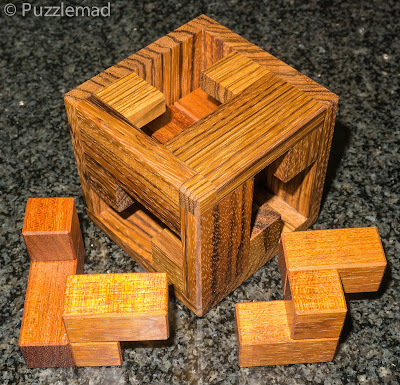
Insider pieces (the third is captive inside)
The disassembly is a nice little exploration and after that the captive piece can rattle around into any orientation. This means that as a packing puzzle you cannot create your shapes outside before working out how to put the pieces back inside. Mrs S never agrees to play with my puzzles and I dismantled it and scrambled all 2 of the pieces and left them for several days. As expected (Alexander had suggested that I do this), the reassembly is a significant challenge - I am critically dependent on creating my shapes first and working backwards. This is not possible and I had to try and do it in my feeble mind. It took me a couple of days before I succeeded and that was only because I understood the disassembly. If I stared from scratch then I might still be doing it! Beautiful AND brilliant.

Golden Pot

Golden Pot by Yavuz Demirrhan
When Yavuz designs something, I always pay attention. He is an amazing designer as well as a superb craftsman. The belief that there is a pot of gold at the end of a rainbow is a wonderful piece of old Irish folklore and it is quite surprising that a Turkish man living in Germany can get a pair of Czech craftsmen to make it but even without a hint of Ireland in the manufacture, this is a simply wonderful puzzle. It is made with an American Walnut pot, a Merbau, Purpleheart, Garapa and Maple rainbow and Grape pieces. Yavuz has used a subset of the Soma cube pieces (including 3 that are doubled up). The aim is to pack all of them into the pot so that the gold forms a level surface with the rainbow buried in it. This is made really challenging by the fact that there is only a 1 voxel clearance around and underneath the rainbow's end making the insertion of several pieces quite challenging. I still struggle to assemble a soma cube and anything like this with a restricted entry is a huge challenge for me. Random trial and error didn't work for the first couple of days and eventually I had to think©. It is actually the restricted entry that is the most important part.
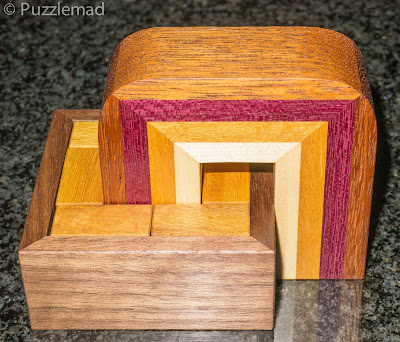
This is one that I will put on display in the assembled form - just gorgeous!
It made me stop and work out how I could get the awkward pieces inside - there is only one assembly but there are 2 ways the pieces can be put inside. A really difficult puzzle for me and will be beautiful on display in the puzzle room.

Soma 6 Pack

Soma 6 Pack by Lucie Pauwels
Lucie Pauwels is well known for designing really clever and fun challenges which are often variations on a familiar theme which she extends or alters to make them more interesting. Jakub must have seen how good this was and decided that we all needed to experience it. He has created a stunner using very vibrant Padauk and Wenge. In essence this is "just" another Soma variant - take the simple tri-ominoes and tetrominoes and create a 3x3x3 cube! But, and it's a really big BUT... Lucie has taken away one of the tetrominoes. Does this make it easier? Yes, it makes it very easy to create a cube with a 4 voxel gap in it but the she has made the puzzle MUCH more difficult by giving us a 3x3x3 box to assemble the cube in with a rather restricted opening and that 4th tetromino is actually fixed into the roof of the box - yes, the roof of the box is part of the shape. I find this also quite mind-boggling because I cannot create my complete shape outside the box easily. Having taken the pieces out to take my photo, I couldn't put any more than 4 of them in and actually needed a rotation to do that! OMG! This was going to be really tough for a Soma idiot like me.
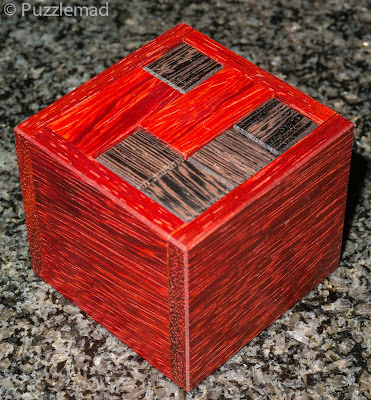
"Just" a soma cube? Not for me it wasn't!
It took me several hours to solve this one and a huge sense of achievement. It is perfect for anyone who really likes to collect all the Soma variants out there (Haym Hirsh has created quite a few that Brian Menold has made over the years and they are massive challenges).

Scrooge

Scrooge by Alfons Eyckmans
This gorgeous construction is another magnificent burr design from Alfons Eyckmans. This one made from Bubinga and Wenge looks ferociously difficult. Anything with this number of pieces frightens me but I still cannot resist them. My fear is always getting badly lost in the disassembly and then being unable to return to the beginning or make progress. This puzzle is complex but not so complex as to worry anyone about being unable to make progress. The reason that Pelikan decided to make this is because it is effectively a 6 piece burr (albeit with stick length of 8 voxels) held within a frame made from relatively simple burrsticks. I absolutely loved the initial exploration of the movements as there were not too many available and certainly no chance of me getting stuck. The first piece takes 25 reasonably logical moves to release and thereafter the rest of the solution progressed very enjoyably. The puzzle remained remarkably stable (if a little squishy) even after 6 pieces had been removed and I eventually managed to remove the entire frame (which consists of 6 identical versions of two types of piece) and was left with the 5 piece burr intact and remaining to be dismantled.
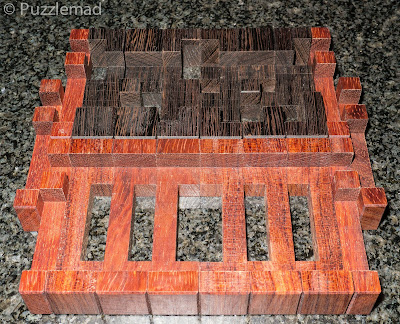
The pieces look fearsome but it was a really fun disassembly
The reassembly will definitely require Burrtools but that is half of the fun.

Minas Tirith

Minas tirith by Tamás Vanyó

This incredibly striking puzzle is yet another fabulous creation by Tamás Vanyó. It has been made with Elm to match the pale city that was shown in Peter Jackson's amazing Lord of the Rings films. Like the Caste builder set in the previous release, the Minas Tirith is constructed using 2x2xN sized pieces that fit in a frame which has restrictions in it. Unlike the castle builder set, the frame actually forms part of the outer wall of the puzzle and greatly restricts the ability to insert the pieces and means that the order of insertion is crucial. I have to state that I have not had time to solve this puzzle. The aim is to create a "city" so that none of the inner rooms are visible externally and also there is an extra challenge which Pelikan have added. Once the puzzle has been dismantled you will see a bunch of interior channels cut within many of the pieces. The aim is to assemble your city so that the supplied metal ball bearing can be inserted into the hole near the top and then can navigate the carefully assembled maze so that it can exit the exterior door after tilting it back and forth in the correct direction. This will be a huge challenge for any puzzler and will leave you with a stunning puzzle to put on display afterwards.


So which should you buy? Well all of them of course! I know that most of you cannot buy them all so will state that my favourites are Insider for the extra challenge of the captive piece, Golden Pot because it is just so beautiful and Scrooge because it is still a six piece burr but made more interesting!

Now I had better reassemble Scrooge before a certain cat runs off with a piece or Mrs S chucks them away for cluttering up her kitchen!


Sunday, 10 July 2022

They Are Insatiable!

Yet More Hex and Screwing Around With Steve and Ali!

More Toys arrive to upset Mrs S!
I sort of knew that "stuff" was going to be made available from the Big Steve and Ali (aka The Two Brass Monkeys) sometime after Allard had posted a review of one of their latest delights, the Six Hookers. I was rather surprised when not just that, but 2 others were also released last week. Needless to say, I cannot resist having Hex with Steve and Ali and immediately fired up my credit card. These puzzles are beautifully made like everything else they have made to date and you won't be disappointed.

Not sure where the new ones are going to go!
Little blue box!
Mrs S was ever so slightly horrified that another 3 had arrived (and to give away a secret, I also received another bunch from Pelikan to review). The desk is kinda stuffed at the moment and the stash in the dining room is getting larger - this is quite impressive when you consider that I am not supposed to be storing any puzzles in that room! 

I did show her one of the boxes and reiterated the well known fact that all girls are supposed to have at least one "little blue box" in their jewellery collection (Guys, if you don't know then you need to get with the program...all girls want something from Tiffany & Co at least once during their lives). Mrs S was not amused that I might think of her as a hooker and was even less amused that I might have 5 others on the go as well! That idea almost got me a second Whack! Ouch! and she actually said that she had enough Tiffany jewellery in her collection already. I wish I had recorded her saying that as I am sure she will deny it vigorously in the future.

It probably isn't going to be of interest to most girls!
When I opened up the box and showed her the interior, she admitted that it was very nicely presented but was definitely not something she wanted to play with or wear and she warned me that I had better not break the granite or a kitchen tile with it. Gulp! The puzzle is 65mm square and weighs 380g. It feels special.

This puzzle design is not a new one and not Steve and Ali's own invention. It is based on a previous puzzle entered into the IPP design competition back in 2001 by Lynn Yarbrough (way before I began my puzzling career) who applied for the patent for the design in 1999. I love how the puzzle insert has misspelled Lynn's name. The original puzzle entered into the competition was made with square based sticks which were oriented on their edges but did have a full description for a hexagonal design which had never been made. Now Steve and Ali are masters of Hex and seem to have it all the time, all over the world so they could not resist the chance to create something new. When they decided to offer me some solid heavy hex then I couldn't really turn them down could I? Not when someone had said it was a good idea over 20 years ago.

It is pretty stunning!
I was a little premature, which is not a good thing when you are having heavy hex! I couldn't resist playing with it straight away and if you are going to have hex with Steve and Ali, you really should be prepared and take your photos first (and maybe get some protection like a suit of armour)! On picking the thing up I had no idea how it was held together and actually wondered if it was some kind of burr. I quite quickly realised that this wasn't the case as pushing on my ends did not have any effect at all and I saw that it was pretty stable in most directions with only a tiny amount of wiggle of all the pieces. It was a bit "squishy" in certain orientations and whilst squishing it I sort of realised what sort of puzzle it was...just as it fell to bits on my lap (or rather on the cat who was on my lap). It was apparent that you really can't have hex with the Two Brass Monkeys on a comfy chair and definitely not with a cat on your lap! After patching up the mess from when he shot off scratching my legs, and stopping swearing I realised I had 6 identical pieces:

Ali and Steve make beautiful hex!
The other side is hidden behind a button - don't look if you don't like spoilers!


I had watched in a sort of slow motion horror as it dismantled itself when I squished it and had a pretty good idea how it needed to be put back together again but...it's a fiddly little bugger and definitely not something easy to do if you are a bit cack-handed and certainly not on a nice comfortable chair with a pissed off cat trying to settle back down again. I couldn't do it. The next day, I sort of desperately attempted to reassemble it so that I could take my photos. Much to the amusement of Mrs S, I was sitting next to her at the breakfast table and effing and blinding as every single attempt to reassemble it failed. I knew what was necessary but really couldn't seem to manage it. A request for an extra pair of hands was met with a snort of derision (she's an unforgiving woman) and the statement that it was more of a puzzling challenge if I did it myself. Eventually, I managed the reassembly and took my pictures before realising that I am a dimwit and had not taken the photo of the pieces first! Aaargh, I had to do it all over again. I have done it several times and it has gotten a little easier each time but will always be a challenge. 

This puzzle is an interesting one - it is pretty easy to work out what is going on but really quite tough to do what is required. I think this would be perfect to give to a smart aleck friend who thinks that many of your puzzles are easy. He will take this one apart and then get very frustrated trying to put it back together. It is beautifully milled and polished.

Tetrahedrane
The Tetrahedrane puzzle is a wonderful remaking of the original Screwballs design from the amazing Oskar van Deventer. Oskar had originally created it in 3D printed plastic and Steve and Ali decided (with permission) to remake it but they "had no balls" and had to change the name to that which described the shape (tetrahedron is the shape that theoretically would be created when the C4H4 molecule is eventually synthesised (if it ever is)).  This one is 6cm tall and weighs 120g. It is a pretty tactile object.

Tritalon and Tetrahedrane
I had played with and enjoyed a possible predecessor of this puzzle way back in 2012. I had bought the Tritalon from Wil and had a nice time working out how it comes apart and then after scrambling the pieces had to work out which orientation everything needed to be in to reassemble it. It was clear that Tetrahedrane was going to be a similar challenge but MORE! They had written the following description:
"The puzzle has six identical stainless steel rods with right and left-handed threads at the end, and four different vertices, each with three threaded holes. The object of the puzzle is to assemble a tetrahedron.
When the boys offer you a chance at screwing around, you definitely take it. I had a little fiddle with the assembled puzzle and worked out which dowels turned in which direction before working my way sequentially around the whole thing until the balls that are not balls fall off. I took my photos and scrambled the vertices so that I did not know which had been in which position.

Beautifully engineered!
Again, I was a fool and attempted the reassembly whilst sitting on an armchair with a cat who really was interested in my brass bits. I had to tuck everything under a thigh to stop him running off with them and gradually worked out what went where. On several occasions, I realised I had got it wrong when I could not orient a rod that would fit on bot end pieces. This was going to be more than just random trial and error. I had to think© - this doesn't come easily. At some point I even lost one of the rods and had to stop puzzling for a while until I had an opportunity to get up and rummage down the side of the armchair for it.

This requires a fair bit of thought and patience - it can't be assembled sequentially as the threads have only a certain length to them and thus the screwing needs to be done simultaneously and gently (as all good screwing should be done). It took me about an hour in all and left me breathless - screwing with Ali and Steve is a tough thing made tougher if you get your ends mixed up. Another fun addition to anybody's collection.

I have a pair of hexy balls - made from brass of course!
It was very nice of the boys to let me have a nice pair of balls! Mrs S is not sure that I should be allowed to keep them as a boy with balls only gets into trouble! On the left is the Gobstopper v1 which is based off the Joy of Hex Missionary puzzle and in the recent delivery is the Gobstopper v2 which is an identical shape but based on the original Gamex design from Bill Cutler. It has 2 assemblies and is sent out in the easier one. The challenge is to find the tougher one. I have not dared to disassemble either of these two beauties yet - they frighten me to death. They are beautiful on display, though. Steve's mum has one of his balls on display!

Mrs Butter (I have no idea why!)
As an extra little gift, Steve had put this in my box. It is called Mrs Butter for no obvious reason. I suspect that after too much hex and with sore hexy balls maybe you need some soothing by spreading some butter about? This lovely little 3D printed delight kept me busy for a good hour. Initially I couldn't work out where the pieces went and then struggled with controlling the pieces for the coordinate motion solution. I got there eventually, though:


Don't click the button if you don't want to see the assembled cube.

Thanks to Steve and Ali for some wonderful hexy time! These puzzles are available now for you from their store. You won't be disappointed!


Sunday, 3 July 2022

Puzzling for Leisure With Stephan

Tetraboard
After the horror of realising that I had created my videos of the skull puzzle from PuzzleMaster with quite a lot of the movement and piece removal out of the camera's view, I spent a lot of the evenings this week desperately trying to put it back together. It took all week and a lot of trial and error but gradually it went back together and my Skull is complete! Phew! If anyone has a full BT file for the puzzle then please let me know.

I have been trying to broaden my puzzling a bit recently. There are obviously some very big producers and sellers of puzzles and I buy a lot from them. This means that my blog is rather top heavy with puzzles from Eric and Jakub and the other manufacturers get seen less. I do try to branch out and try other manufacturers and also try to go back to the more mass produced puzzles a bit including getting back into twisty puzzles. Unfortunately, I seem to only have a little bit of time during the week to play and often actually solving something is a challenge in the time I have. My week this week was absolutely horrendous with a lot of big operations being done and finishing late and a fair bit of admin that I needed to do in my non-theatre time. The evenings were spent on the skull.

Fountain
I had bought a couple of new creations from Stephan Baumegger (he sells via his Facebook page, PuzzleLeisure) way back in April and they had been idly fiddled with but had not really been attempted properly since they arrived. I have been leaving my new arrivals in the dining room for the last few months as a storage area to ensure that I don't lose the new ones amongst all the stuff that is solved and waiting to be put away (yes my study is a shithole again!) Mrs S looks in the dining room periodically and when she has tidied away all of her acquisitions then notices that mine are still there and then grumbles at me with a violent "I might just burn them" look in her eyes. Gulp!

This, along with the wish to try some other craftsmen's stuff, made me wander into my "accessory puzzle store" 😈😈😈 and pick up the Tetraboard and give it a try.

This puzzle is a new design from Stephan which he had originally designed way back in 2013 with the help of the incredibly talented Stephane Chomine and produced in very limited numbers at that time. At that time, my puzzle budget had been quite a lot lower than in recent years and I had marvelled at it but been either too frightened of the level (56 in total) or had not been ready to spend more money. Stephan had decided to make a few more this year and I couldn't resist the wonderful stepped look of it and the 2 contrasting woods (Wenge and Maple). 

I picked it up on Saturday morning thinking that I would have enough time to solve it that day. That was before I realised just how difficult it would be and also that Mrs S would send me out into the garden to do some maintenance work there whilst she cooked a Moroccan chilli for dinner (Yum). I managed to spend an hour on it before I was banished and had found a few moves which went nowhere and that was it. Four hours of gardening and a bout of sciatica later, I was back inside feeling sorry for myself and started again. It is quite hard to concentrate on a puzzle with lightning pains shooting down the back of your thigh! But for my readers, I persevered! It took me another hour to find a very well disguised move that would open out quite a lot more movement in the puzzle. The puzzle is made from a cubic frame and 5 plate burrs which are very tough to get oriented. I repeatedly found that if I put the puzzle down for a bit then I couldn't easily work out the correct orientation to start again. The way they interlock seriously constrains the movement and every time I thought I was getting somewhere, I came to a halt and could not seem to advance. Luckily returning to the beginning was always a simple task. 

I had explored all the paths I could find and was never able to get more than 10 or 12 moves into the solution before I came to a dead end. I was missing something. It is pretty difficult to see inside the puzzle and plan possible moves so I was stuck. At the end of the day, I went to bed with an unsolved puzzle, a headache  and back pain! Damn I'm getting old and useless!

This morning I bounded out of bed after my cat decided he was going to lick my nose, face and the top of my head! He has a very rough tongue and bad breath! Time to get up and feed him (which was what he wanted). A bit of painful exercise on the rowing machine and I was ready to puzzle again. Refreshedin body and mind and only a little residual sciatica left over. I did what I had done multiple times on the previous day and immediately found a new move. I have no idea how I missed it (it must have been very well hidden) but I wasn't going to backtrack and lose the progress. A few minutes later and the first board came out.

This was a cause for celebration but not complacency. There had been 18 moves required for the first piece and the next was going to need another 18. With the removal of the first board the puzzle was still 100% stable and a few new moves were opened up as possibilities. None of them worked and I was stumped again. The view inside was slightly better but not enough to really help plan future moves. I was missing an idea. An hour later, I had backtracked the remaining pieces almost to the beginning of the puzzle with the one board left out. I quickly realised that another sequence had been opened up from almost the beginning and a new short path was available which allowed a second piece to be removed. Yay!

Now, with 2 boards removed, it was still very stable(just a little bit wobbly) and I could properly see inside. Now I could easily mange the next 12 moves to remove the third piece and there after it was fairly trivial (it did not collapse at any point which is quite refreshing for a burr disassembly). Amazingly, I realised that one of the boards had not moved at all during the disassembly of the first 3 pieces. I had tried on numerous occasions to use it in my solution but it just was totally trapped. Very clever puzzle design. I took my obligatory puzzle piece photo:

Tetraboard pieces
All in all, about 6 hours of puzzling and now I had the extra delight of making my Burrtools file which is always part of the fun. I was definitely going to need it for the reassembly.

I love these challenges - it needs to be just the right level. I am not a burr genius like Goetz and when a first piece requires about 18-25 moves that is just difficult enough for me. If you are interested in buying any beautifully made burr and interlocking puzzles from Stephan then get in touch via his FB page.


Sunday, 26 June 2022

So Tough I May Just be Bones When It Is Reassembled

PuzzleMaster and Jerry Loo's Skull
This blog post was produced a day earlier and in a hurry because I am working the weekend yet again - the solution to this one nearly killed me and I have not even attempted to reassemble it yet! It may remain in pieces for the rest of time which is unfortunate because Mrs S actually likes the look of it.

This fabulous creation which has been mass-produced thanks to PuzzleMaster's use of a Kickstarter campaign is now available for everyone to try out but you should all be warned... the level 10 is very well deserved! This is a seriously complex and difficult puzzle. 

It had originally been designed by Jerry back in 2019 in a simpler form called Cranium which was iterated over a period of time until it reached the current (considerably harder) form. Later that year, one of the earlier versions was produced by Eric Fuller in a very limited edition (this one had 26 pieces and was called the Berro-skull). As it got more and more complex, it was only ever made by 3D printing and never in any significant numbers. Jerry has been known to produce small batches of stainless steel puzzles, one of which I reviewed (along with the PuzzleMaster anodised aluminium version) here. He did attempt to produce the 67 piece skull in steel himself but could not find a way to do it himself and his local fabricator could not work with such tiny pieces. Luckily for us all, Leon Stein (owner of PuzzleMaster) decided to spend the time and effort working with Jerry to get this produced and functional. The end result is stunning!

I backed the Kickstarter campaign but it is now also available as part of the PuzzleMaster own brand metal puzzle collection at a very reasonable price of $144CAD. Believe me, for a puzzle of this complexity with this many well-finished parts in any material, this is a very good deal. In stainless steel this is bordering on unbelievable! You could say it is a steelsteal. It is a substantial item at 7 x 6 x 5.1cm and weighing in at 800g. Mrs S straight away told me in no uncertain terms that it was not allowed anywhere near the kitchen work surface or floor tiles - if I break any of them then she would break me! For heaven's sake, don't show her the picture at the top of this blog post!

I was again too frightened to start on this for a very long time but eventually screwed my courage to the sticking point and had a fiddle. Much to Mrs S' amusement, there was no progress for an embarassingly long time. I was able to find that the wooden mouth shape was easily removable and also found another move of a single piece but nothing would slide off/out. Bugger! I think it must have taken me another 4 or 5 days before the next move became apparent to me much to my relief. This wasn't because of any flaw in the deign or manufacture - I was just rubbish and did not attempt the correct move for a long time. Having found that next move, pieces started to be removable...lots of them and I got "the fear". I quickly backtracked and put it back together again and left it for a while. Several days later, having found some more courage (I seem to recall that gin helped), I did it again and went a bit further by removing about 10 pieces. This was fun! Great fun! Then I tried to backtrack and had a pair of pieces that I could not replace - I am blaming the gin but you may think it was me being a simpleton. I was able to put it back together with that pair of pieces left outside the puzzle and after a bit of a panic, I could work out from the holes left where they went and reassembled it properly. 

That experience frightened me quite a lot and I left it alone for several weeks until my workload meant that I had to find something to solve soon or there would be no blog post this week. Once my fear of no blog post and exceeded my fear of the puzzle, I started again and decided that the best thing to do was to lay all the pieces out as I removed them and backtrack regularly during the disassembly. Of course, once I was about 10-12 pieces in, I was unable to return to the beginning and there was a huge flurry of effing and blinding as I desperately tried to work it out. Yes, I scared the crap out of myself again and decided I would take a few videos of the dismantling so that I might possibly stand some chance of reassemble. The video had to be taken over several attempts due to the need to feed a very loud Burmese cat, having to deal with Mrs S making very disparaging comments about my prowess and due to my general incompetence. I got stuck on the disassembly on numerous occasions and on several occasions had to desperately try and work out where some random piece of metal had come from after it fell out from inside with me having no clue of the original position. When I looked back at the videos to try and see where these pieces had come from, I realised that quite a bit of the recording was 1. out of focus, 2. out of site of the camera and 3. not helpful with my mystery pieces.

After about 4 hours of swearing and being laughed at I could take a photo - this is the pieces carefully arranged in a rough order that they came out in 3 batches - believe me, this is NOT a spoiler!

This may be how it stays forever more!
I have wrapped the pieces up in the white pillowcase that I have used to provide contrast for the photo to try and prevent the curious cat rearranging the order or even running off with any pieces. I hope that I can one day reassemble it - I am desperately looking at my rubbish videos to see what I can do. The review left on the PM site from Tyler (a well known puzzler and friend) states that if you take your time about the disassembly then you should manage to put it back together. I tried to do that but at some point lost track and just proceeded anyway. I think that I might be in trouble - wish me luck! There are hundreds of solutions on the PM site here but predictably this one is not amongst them - GULP!


Sunday, 19 June 2022

Qiyi Clover Pyraminx - Looks Fearsome But...

The Old Up-Up-Down-Down Works a Treat!

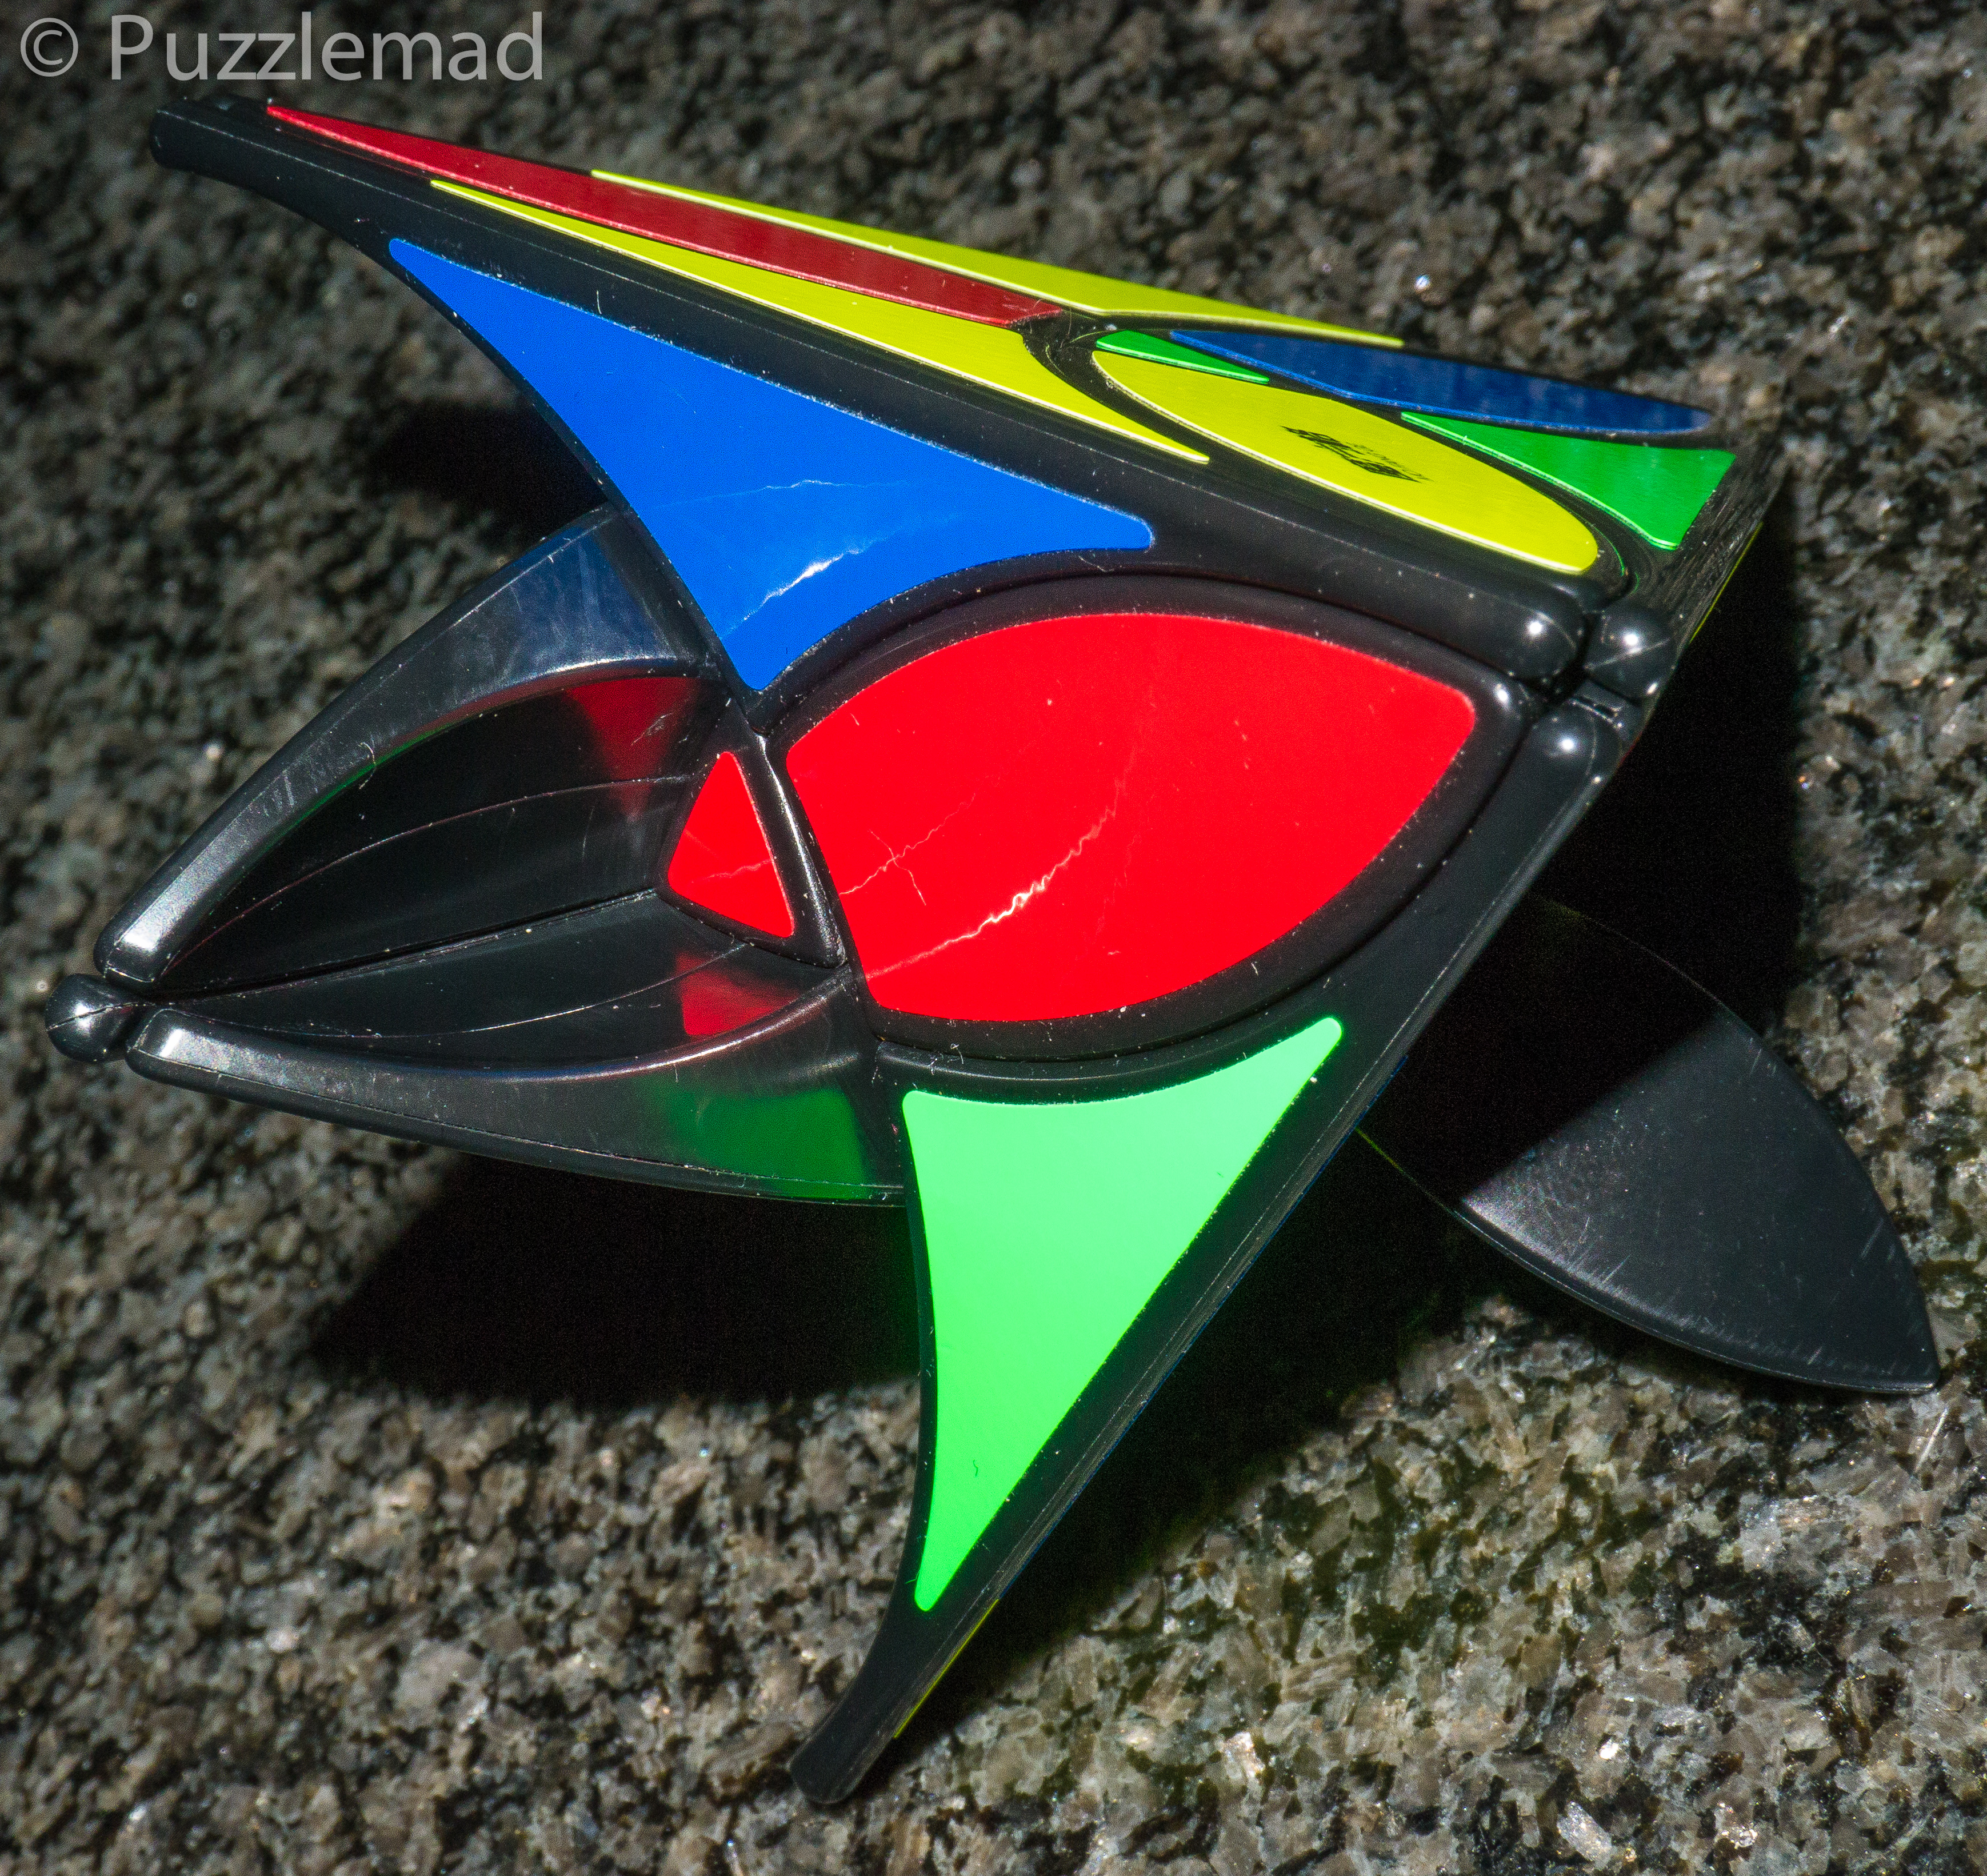
The Clover Pyraminx
An edge turning tetrahedron
This might be even more incoherent than my usual drivel. I have actually managed to have some time off and went to Edinburgh to visit some friends as well as relax and visit the Outlaws. A very nice relaxing time in all and a few very nice expensive meals as well. I have just arrived back home having driven 250 miles and am trying not to disappoint all you suckers lovely people who, for some reason, keep reading my rubbish. 

I had bought a few new twisty puzzles some weeks ago to try and catch up with the backlog of new toys that have come out and are being shown off by the return of Rline to YouTube. Amongst them was this Clover Pyraminx, a tetrahedral version of the edge turning Clover puzzles I have reviewed before.

I love edge turning twisty puzzles for several reasons...primarily because a lot of the solve process for them tends to be very intuitive right up to the very end game and also because they shapeshift and jumble, taking parts out of their natural orbits and often leaving all sorts of fearsome looking "sticky-out bits".
After just 4 moves!
Having seen the frightening shapeshifting, I quickly went back to the beginning and did my usual first approach for these and attempted a non-shapeshifting scramble using entirely 180º turns. It is a lovely turner but you do need to watch your thumbnails as the edges get caught and attempt to rip your nails off (YeeeeOuch!). It doesn't take long to get a nice mixed up puzzle and as expected the solve is a pleasant logical one of performing 3-cycles on the petals until they are all in place again. To you non-twisty puzzlers it sounds impossible but it really is just pure logic. The first 2 times that I did this, I magically ended up with an easily fully solved puzzle after just doing my logic solve process. At this point, my luck ran out because the centre triangles were scrambled when I had finished. For some silly reason I had just thought that solving the petals was just automatically solving the centres at the same time. As has been said by almost all puzzlers around the world: "you are not terribly bright sometimes"!

Oops! Now what?
I sat and stared at this for quite some time with absolutely no clue how to control the centres without mucking up the petals. In desperation I descrambled and resolved and from now on every single time left me with 3 centres swapped around. Not always the same ones but always three of them. It was time to Think©. I use the copyright symbol even if Allard cannot/won't do twisties because I know that if he really tried then he could easily do them. After some fiddling with the Up-Up-Down-Down combination for a while I had a Eureka moment (No, I did not make Mrs S sick by running around naked). A simple set of 4 moves moves 3 petals and leaves one centre piece from one face on an otherwise untouched 3rd edge. If I turn the third edge and undo the original 4 moves then I reverse all the petal moves but have created a 3-cycle of the centres. It is a COMMUTATOR and I found it all by myself - I am a genius! Ok, maybe not (that term refers to Derek) but having found my little set of moves I was now able to solve the simple scramble every time - Yay! Time to take the next step and do a full jumbling and shapeshifting scramble:

Oh dear! That wasn't a good idea!
Yet again I nearly lost my thumbnails and suddenly wished that I hadn't done that! The usual first stage is to return it to the original shape (it always leaves you with pieces out of orbit but you can sort that later). The process of returning to tetrahedron had me stumped again for quite some time. My first time I managed to almost do it before realising that every single edge was perpendicular to the correct orientation and I had created an unsolvable position. I corrected that and tried again. Each time I could get almost there but was always left with a protrusion (not bad for a man my age!) and yet again I had to think© - luckily for me the thinking© did not have to be deep. If I do my Up-Up-Down Down moves with a partial edge turn and it sinks the protrusions back inside...Mostly!

Where did that come from?
I managed to get it back to tetrahedral shape except there were black pointy bits sticking out and it was not terribly obvious where they had come from. They had no stickers on them and therefore were obviously internal pieces that had been left outside during scrambling and partial solving. Where did they belong? The clue to that came from looking at where they always appeared. They were always found in the place of the centres and I could eventually (after banging my head on the wall for a bit) workout that the centres were now inside the puzzle.

If you twist some of the edges until you find a little clue:
The centre is hidden in a little cavity inside the corner - in the picture to the left the red triangle is inside the puzzle and only revealed by partially turning an edge. So, how to I swap those? On various occasions, I have managed to get anything from one to 3 separate sticky-out bits on various faces. The secret to beat it? Yes, you are good at these! It is the Up-Up-Down-Down moves again. This time you need to do it with 2 edges hard turned out of place and then performing our magic sequence which returns the puzzle to proper shape. Phew! That wasn't too bad was it? Actually, it nearly killed me - all of these discoveries were over a period of 10-14 days and had my colleagues at work laughing at me when I either swore at the bloody thing for having protrusions or swore at it for injuring me. I really suffer for you guys, you know!

Once I had my shape again, I was able to do my intuitive solve using the magic sequence. This, I knew would only get me so far as some pieces will inevitably shifted out of their natural orbits and would not have been returned by the removing of the shapeshifting. Eventually, I ended up with something like this (sometimes on several faces)

Nearly solved but 2 petals are out of orbit (ignore the centres)
With the Curvy copter or related Clover cube (both cubic edge turners), this sort of issue is sorted by carrying out double jumbling moves to swap orbits until they are back in the correct orbit and then can be moved into place by intuition. There aren't enough faces to do that here and I had to adapt the magic technique to allow the fix to happen. Again we have a 3-cycle of pieces using the simple 4 move sequence but starting with a partially turned edge:

Turn one edge and then cycle those petals
Using the front left and right edges and starting with the left one, I can do a Down-Down-Up-Up and those 3 petals cycle around until they are correctly placed. After that is done with all the orbit errors, then the centres may need to be solved and you are done! Fantastic! I worked it out all by myself with only a little (alright, a LOT) of help from Allard. My colleagues were amazed and everyone thought I was brilliant.

And then I tried to do it a few more times and found something awful:

It's a 2-cycle! That's impossible!
My colleagues laughed at the look of horror on my face when I came up with this scenario. I had just 2 centres swapped and as any twisty puzzler knows, a 2-cycle is against the "law of the cube". This is just impossible. 

After my initial blank thoughts, I went back to some of my early blog posts and realised that I had an error caused by a "False equivocation". This occurs when you place a piece into position because it looks like it should go there but in reality it is out of place. This can occur either because it looks identical to some other piece or because it has no stickers to tell you where it belongs (this was the case here). I realised that I had put the blank sticky out bits back inside the puzzle but they were placed randomly into whatever vertex I found. I realised that I had inadvertently swapped 2 of this blank internal pieces with each other and had no way of knowing. The manifestation on the outside was a pair of swapped pieces but in reality it was 2 pairs of swapped pieces and this is perfectly possible and relatively easy to fix. I used my earlier fancy move to take a vertex out and swap it with a centre and then replace it with a different vertex before putting the second one back where the first had been. This invariably left me with a 3cycle of centres to do and my puzzle was done. Hooray!

This is actually a wonderful puzzle - it is not too difficult for any experienced twisty puzzler and has some interesting features to make it a must-have in the collection. I would also say that anyone who is just starting out on twisty puzzles should also obtain a copy - solve the Clover cube or Curvy copter first and then move onto this one. It takes you several steps further in your solving and learning process without being too frustrating. Just watch out for those thumbnails! It is available from most good puzzle stores - PuzzleMaster have it here, or you could try the Hong Kong stores. Well worth your money!


Sunday, 12 June 2022

Cannon Puzzle

Puzzlemaster Cannon
A real quick one today as I had to write the work rotas yesterday (including August and September with the school holidays). It took me 8 hours or more and I am fed up sitting on my arse in front of a computer!

When the PuzzleMaster Kickstarter campaign came to an end, they offered the chance to buy some of their metal puzzles and add it to the rewards that you had purchased. Most of them I already owned but the Cannon was a puzzle that I had seen before and played with (loaned by a friend several years ago - thank you Michel) but never managed to obtain my own copy. I couldn't resist it at $30CAD. This is a remake of a classic puzzle and it has been very well done. 

The puzzle is rated as 7 on PuzzleMaster's 5-10 scale and I think this is about right. It is beautifully presented and really nice and shiny in Brass with the painted red cannon trolley. The aim is to release the cannonball from within the barrel of the cannon - it is sort of a very simple sequential discovery puzzle. I did find it quite humorous that there are instructions telling me that the trolley is only for decoration/display and not to be dismantled to solve the puzzle.

In all, it took me only about 5 minutes to solve but part of that will have been because I had played with the other version, The manufacture of this is spot on - tolerances are perfect and, if you have never seen it before there are a couple of very nice Aha! moments during the solve process.

The cannonball blends in with the granite
Keep it away from cats and toddlers!
Whilst it is not difficult, it is a lovely classic puzzle that everyone should have in their collection - it is perfect for showing to non-puzzlers to get them hooked on the aha! moment. Unfortunately it is sold out  at Puzzlemaster for the moment but it is available from Brian and Sue Young in Australia here and if you don't own the Houdini's torture cell yet then go and buy it with the Cannon together (a special deal here).


Sunday, 5 June 2022

A Cat for the Mantlepiece? Yes Please, Juno!

Mittan
Yes, Junichi and Yukari Yananose have done it again! They have created a masterpiece that is fun to solve, a nice challenge for a puzzlebox newbie like me and have also made something that Mrs S approves of and wants displayed in the living room.

Back view
Mittan is the name of their own rather lovely Ginger cat (I have a photo so I know that she is lovely). I cannot resist these puzzles from Juno and despite the relatively steep price, I immediately decided it was a must buy. I also knew that Mrs S, as an archetypal crazy cat lady, would not object to this one (I haven't actually told her the price though). We originally started with our lovely Burmese cats in the hope that having real cats might decrease or even stop the ever increasing accumulation of cat substitutes around the house (this was silly of me in retrospect). The entire house has cats stuff everywhere and now it has one more item. Juno absolutely despises the puzzle flippers who only buy to make a profit and hence the price was made high (the woods and work carried out were quite expensive) and for this reason he also made a larger number than usual - 150 in total (as of writing this there remain 13 in stock). The woods making up this startlingly beautiful puzzle include Zebrano, Golden Sassafras, Fijian Mahogany, American Black Walnut, Europian Beech, Amoora, Silver Ash and metal parts (including magnets). It was initially available with the opportunity to buy either dark, medium or lighter Zebrano but the dark has sold out. I actually chose a medium to have a very marked grain pattern. I was not disappointed - it is stunning and even Mrs S liked it.

There are two aims with this puzzle - to see how they managed to put a bell on(?in) the cat and to find the fish that Mittan has eaten - it is supposed to be a Taiyaki (a sweet in the shape of a sea bream). I am not going to take you through the solution - you need to buy it or borrow a copy and do it for yourself. 

The solution of this actually took me a whole week! It arrived unbelievably quickly considering the distance that it had gone and I set to straight away. There are a few pieces that are obviously intended to be manipulated and quite quickly a sequence of interesting moves builds up. After a short while you get to do things that you really shouldn't be doing to a cat but try to bear in mind that it's not a real cat and carry on. After the first few moves, I had a couple of pieces and got stuck. It is quite different to the other SD puzzles from Pluredro and nothing I had done before was terribly helpful. Eventually, I worked out what the next move needed to be and I had a new tool and a possible place to use it. My initial attempts at using that tool completely failed - the rest of the puzzle needed to be in the correct positions for it's use to work. Eventually the dismemberment continued...poor Mittan!

Continuing my odyssey into cat dissection, I reached a point where I had more tools and an obvious way to use one of the new ones but it was locked tight. This needed some of Allard's thinking© and I proceeded to dribble into my coffee in the evening. One more Aha! moment produced a critical movement......of about 4mm before it stopped dead. Flummoxed again! I tried the same move over and over and over again in the hope that maybe I had done it wrong the first 8 or 10 times. Needless to say, nothing changed with subsequent attempts and I proved that I met the criteria for madness...again!

At some point I did wonder to myself whether the prize inside might have blocked the mechanism but I know Juno too well. This just does NOT happen with his puzzles. I was missing something. In fact, I missed it for 5 evenings of increasing desperation. Finally, whilst idly playing with all the pieces in a pile, I made an unexpected discovery. Now that should not be there! Unless, of course, Juno had put it there for a reason! I looked for any way that I could use my discovery and I was rewarded with a sudden movement of the piece I wanted. I finally had the bell from/for poor Mittan. It is hidden behind the spoiler button (it's not much of a spoiler but don't risk it unless you really want to).


Once you have found the bell, you have also found the fish that Mittan had eaten:

Yummy!
At least he didn't put a loaf of bread in it - this proves it's NOT a box
The reassembly back to a complete cat with all the pieces inside is a nice sequence which only partly needs to be a reverse of what you did to open it up. I loved it and have done the whole thing multiple times since my first solve. The clever (and not hugely difficult) solution is fun to do and does have an element of the worry bead in several parts. I did not show the dismemberment to my own boy despite him sleeping on my lap through much of it. I didn't want to give him nightmares as he already wakes me up at 5am every day demanding food and attention!

Having finally finished playing with this wonderful creation, which, I must say, was worth every penny of the price. I asked Mrs S whether I should put it into my display cabinets with the rest of Juno's puzzles? She actually said that it should go on display on our mantlepiece alongside quite a few other animal figurines and puzzles:

An embarrassment of cats!
There are several cat puzzles on show (Maahes the line from Stephan Baumegger, Burrlephant from Jerry McFarland, Jack Krijnen's Bison from Jakub Dvořák and the Elephant also from Jakub Dvořák. As you can see, there are quite a few porcelain cats and the elephants that I inherited from my late mother (she grew up in Kenya and had elephants in her garden as a kid).

I think I might just attempt one of the new twisty puzzles next. I do still want to try and review puzzles that are a little less expensive to help the puzzlers out there who may be a little more price constrained than me.