Sunday, 1 October 2023

An Edgy Puzzle - But Still Intuitive

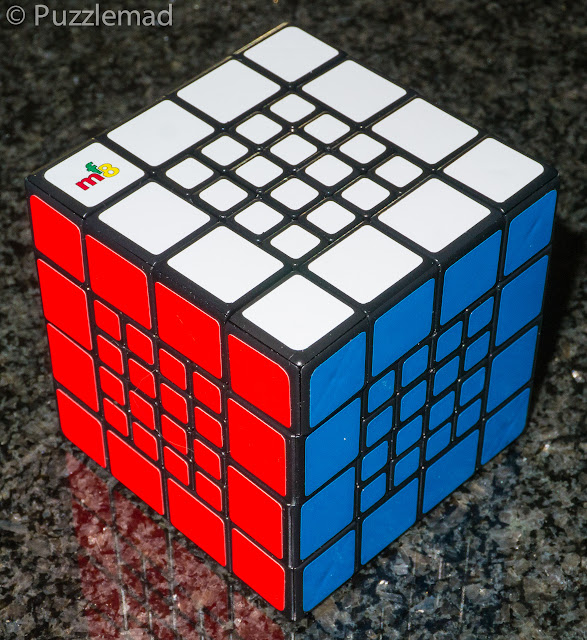
Son-Mum 4x4 cube (v1)
The Son-mum 3x3 cube was released back in 2018 and I loved it for the challenging thought processes it required and the nice parity that I had to think through. It was even mentioned in my puzzles of the year as one of the best challenges.  Then a few years later, those evil twisted men and women at MF8 decided to create a new "harder bigger" version and the 4x4 version was released. I bought it at the end of 2021 and had a little fiddle and shied away from it as impossibly difficult and likely to end in tears for me and laughter for Mrs S. I kept looking at it lying on my desk where it taunted me for nearly 2 years and upset Mrs S because she couldn't stand the mess that my desk was in but I could not bring myself to pick it up. I spent a bit of time on holiday in Scotland 2 weeks ago and having limited space to pack puzzles for the journey, I brought a couple of twisties with me as likely to keep me busy for a while. When I finally got around to pick them up, I actually realised that I had not solved any twisties at all for a very long time and was a bit rusty. I needed to play with this as a 3x3 and a 4x4 a few times to remind myself of the very basic techniques (you really should all try to learn how to think about the basics - it really is NOT difficult to solve basic cubes once you have an understanding about the simple edge piece series and corner piece series and how they can be used - I have discussed them previously with multiple other puzzles and Rline has a wonderful set of video tutorials here.

So what is special about this puzzle? First off, you can quickly see that the centres are formed from 16 pieces instead of the usual 4 and it looks impossible to separate many of them. Here is where the fun starts - of course you can do a standard 4x4 scramble but then it is possible to do a 45º turn of the middle layers and then continue to turn the faces - this not only splits up the centre pieces but it also allows the edges to be swapped with centres and the outer edges to be tilted. Here is the puzzle after just 3 turns with a 45º turn done:
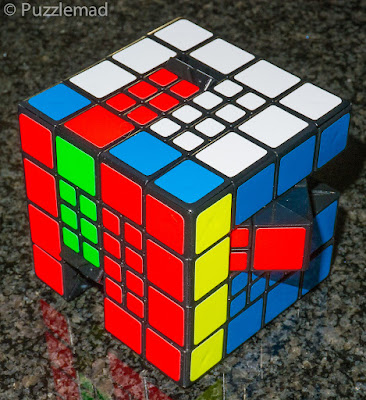
This is why I kept picking it up and putting it down
Interestingly, there appear to have been no English language solution videos posted on YouTube which may have given an indication of the extreme difficulty of the puzzle - at least that was my thought process. 

As usual with any new twisty puzzle, I experiment with the edge piece series and the corner piece series to see what they will do when you add in the fancy moves that each new puzzle allows. Interestingly, the corner piece series was absolutely no use to me whatsoever! It either did nothing and the puzzle just remained solved at the end of the simple sequence or there was no real pattern to what it did (in fact one attempt was blocked by the bandaging caused by the 45º turn). Then, as usual, sob, I lost track of what I had been doing and ended up with a partially scrambled puzzle that I could not back out of. Damn! Oh well, I had better get on with it...
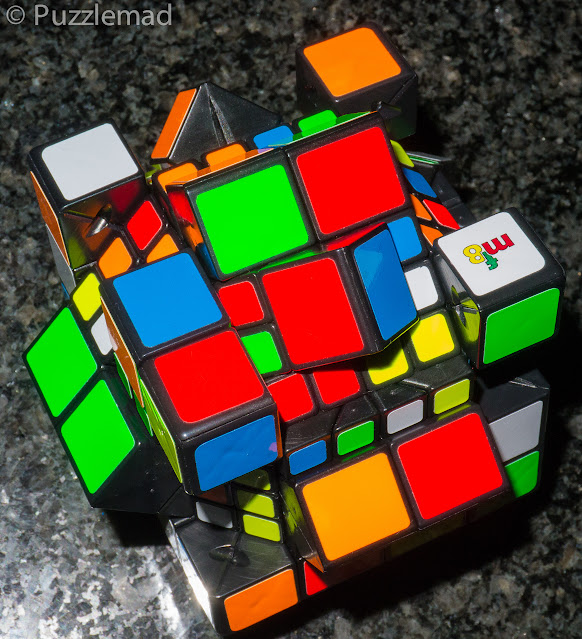
OMG! That was probably not a good idea!
This thing would now barely move - so many of the turns were now blocked by either a twisted edge piece lying across a face (see the red/blue edge above) or by a pair of tilted centre pieces lying across a face (see the green centre piece at the top right). What the hell do I do now? There were no instructions anywhere so I guessed that I had better figure it out. First step, get it back to cube shape - so blocked up that no algorithms are possible so just use intuition. To my huge surprise, it was just intuition to achieve this up to a certain point. Once a few pieces had been aligned either properly in a centre or on an edge then more faces would turn and it was time to try and put the edges where they should be. Here we just have to use the edge piece series aka "up-up-down-down". Yes, it's just a 4 move sequence - it cycles 3 edges around. I realised that if you can do a 45º turn to put an errant edge pair back and then cycle a centre pair out then gaps start to be filled:

Errant edge pair in a centre
Edge pair turned 45º onto an edge
Edge pair now front left & centres in place
If the centre stripe is turned back that 45º then then one edge part and centre set are in place. This will need to be done repeatedly and where there are single edge pieces out of place they will need to be turned and moved until they can be lined up in a pair and then rotated into an edge using the edge piece series. It is surprisingly fun and apart from the frustration of the bandaging forcing a bunch of preparatory moves to clear the way, it doesn't take long to get a near cube:
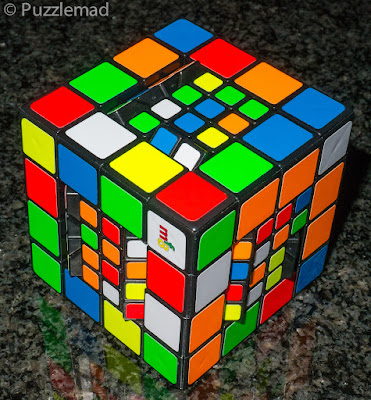
Sort of cube shaped
Here is where I have really struggled. I have edges and centres where they are supposed to be but a bunch of the centres are tilted. I have not managed to find an algorithm to easily flatten them and had to make something up. If there are 8 or 16 of them tilted then that makes either 4 whole faces or 4 half faces on a layer out of kilter and all that is needed would be to turn the slice 45º, use the edge piece series to place an edge in it and then turn another 45º to place the centre that came out into the next position along. If you do this 8 times then you have broken and recreated every edge and centre in a slice. Sounds awful but is, again, entirely intuitive. What I have not worked out how to do with ease is what to do when there is not a multiple of 8 tilted edges. I can fiddle with my 45º turns and break up the flattened centres and with some thought I can make it so that a multiple of 8 are left tilted (I either add some or fix some). It works but I don't really know a definite sequence. Either way, it is, yet again, mostly done by intuition. Once the centres are flattened it looks less horrific:
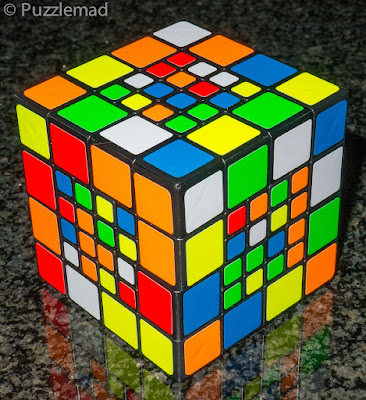
Nice and flat
Now it's time to recreate the 2x2 centre pieces
To most puzzlers who don't do twisties, it still looks awful but from now on, it is actually really simple and fun. All that is needed is to pair up the single cubies. In the picture above, there is an orange pair top right of the centres and another pair bottom left but inset a little. Another 45º turn and a face turn will allow them to be linked together:

45º slice turn
After turning the front face and replacing the slice
Once each centre 2x2 is formed then it is moved out of harms way and another one worked on until they are almost all done. There is plenty of leeway here as there are only ever four centres that are affected by that simple sequence and when you are down to just a few then placing two identical colours in opposite faces is trivial and means that 2 centres can be worked on in isolation.

After that...you just have a 4x4 cube to solve which, if you are working on one of these, shouldn't be any difficulty. I had been expecting some sort of parity like I saw with the 3x3 version but this does not seen to occur with this puzzle. The 4x4 parities are still a possibility but nothing new.

All in all, I was rather surprised at my ability to solve this monster. I had been frightened of it for nearly 2 years and the lack of anyone on YouTube showing it off made me think it was impossibly tough. However, it is surprisingly a lovely process and requires nothing more than intuition and the Edge piece series. Thank heavens to Rline for showing that sequence to me all those years ago and making me truly understand the power of those 4 little moves! If you can solve a 4x4, then you should buy this puzzle.

After this one, of course I couldn't rest and I went to work on another monster! the Master Mixup type 1:

30º mixup turns will lead to a monstrous challenge!


I have been a very lucky boy - Mrs S got very angry with me! Yes, that is lucky. She got so fed up with the state of my desk that she "forced me" to go online to Ikea and buy some more bookcases. Whilst on annual leave I have been arduously constructing and mounting them and am just about ready to start clearing my desk into them.
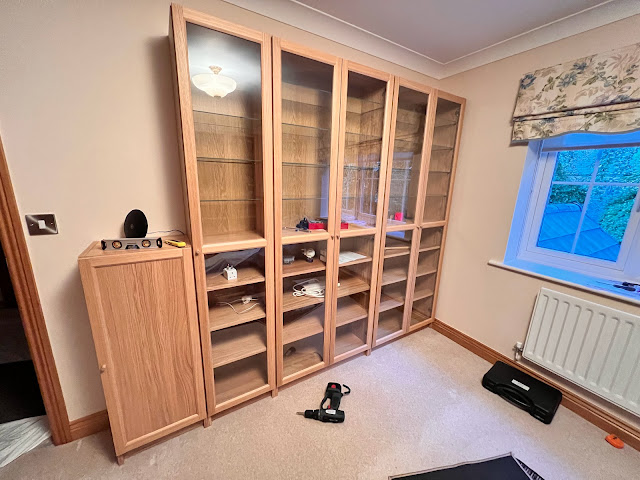
Puzzle room number 2 is ready
All nice and level no thanks to Barratt homes!
In the process, I discovered that my house was built by 14 year old apprentices with no skills! The floor is horrendously off level! It has taken a lot of effort to get these cabinets level. Lucky me has 3 double Billies on the opposite wall and now 2½ on this wall plus a closed one for less beautiful toys.

Thank you to Mrs S! 😇😇😇


Sunday, 24 September 2023

A Wallet Worth Putting In Your Pocket

Coin Wallet by Koichi Miura
No spoilers (picture from the design competition page)
Here’s another of the wonderful puzzles by Koichi-San that did very well in the recent IPP design competition - it won the Jury first prize and there’s a good reason for it. 

I bought it a few months ago and it remained untouched because of time constraints and other puzzle arrivals. After Allard reviewed it in May, I moved it to my work bag where it again sat for several months. I did get it out and fiddle periodically but my case mix at work is now too challenging to split my attention off to play with a toy during a case. One weekend recently, I actually finished all the trauma cases a bit early and had a little time waiting around with nothing to do. Time to play with my money! Ok the coins are plastic and definitely not legal tender but still quite tactile and worth the expense.

There are 4 pieces with stacked coins and a limited opening into the wallet. When it arrived it is almost there. All the coins are sort of inside but peeking out the top opening:

Almost…but not quite
Taking the pieces out, the first thing to do is work out how the pieces can be assembled in the restricted space but outside. There are not many options really so should be easy…yeah right! Koichi-San does no design easy puzzles - there is always a catch and definitely with this one. After all, there must be a reason it did so well in the competition - if such experienced puzzlers rated it so highly then the Aha! moment should be fabulous.

Having worked out the only possible arrangement of the pieces inside, it was time to place them through what I thought was a decently sized wallet opening. And here is where the fun starts. That opening is tantalising. Big enough to give hope but small enough to dash them quite quickly. I even tried some disentanglement moves to place more than one piece at a time through that entrance. Whilst that was helpful in the end, it was only a small part of the solution. I spent a good ½ hour trying various entrance manoeuvres with no success and then tried some burr type moves. The Aha! moment was wonderful. It is really very logical and a nice sequence requiring several moves. My coins were packed - no photo spoiler I’m afraid.

I then handed it to quite a few work colleagues to play with and all thought it must be easy only to have their hopes dashed quite quickly. There is something quite compulsive to it because they could not put it down and at one point I had to take it away because they were ignoring their work in the operating theatre. They kept asking me for it each time there was a break in the day and none of them were able to solve it. Mr Miura seems to design puzzles with just the right difficulty level to be challenging to real puzzlers and yet almost impossible for newbies. The newbies keep playing with it because the design shapes are compulsive and demand to be picked up and played with. Who can resist a wallet with a bunch of coins to fit inside. I even showed the solution to one of my coworkers and then he still couldn’t repeat the solve despite having seen every step. This was a fun torture device!

This puzzle is so good that I will keep it in my work bag to keep other theatre staff occupied when they should be working. That bag is killing my shoulders as it is chockablock with puzzles for me and others to play with! 

If you want a copy then I think Mine is going to be making more of them and in more colours judging from his FB page. Again, no spoilers here.

This is awesome! Well worth adding to your collection.


Sunday, 17 September 2023

A Knot Without String

Knot by Abhishek Ruikar
Abhishek has burst onto the puzzle scene from nowhere and seems to have produced a few very well received puzzles over the last year or so and I had missed them all. He showed off the Knot a couple of months ago on the Mechanical puzzle Facebook group and I couldn’t resist it. It was made of wood and had an interesting idea to it. When Neil reviewed it on FB and was pleased with the idea and puzzling level, my decision to buy was confirmed. Contacting Abhishek directly through FB messenger was a breeze and I purchased directly from him using PayPal. His designs are now available from PuzzleMaster as well as Nothing Yet Designs and I can recommend them.

It took a while to arrive from India because Abhishek was away from home when I contacted him and the British postal service seems to be falling to bits these days. I was delighted when I opened the box because the presentation was unexpectedly beautiful. There’s a nice black box with the name printed on it which slides open to reveal the Teak puzzle pieces held in foam and an instruction card alongside. It’s as if it’s been made by a professional puzzle supplier. 

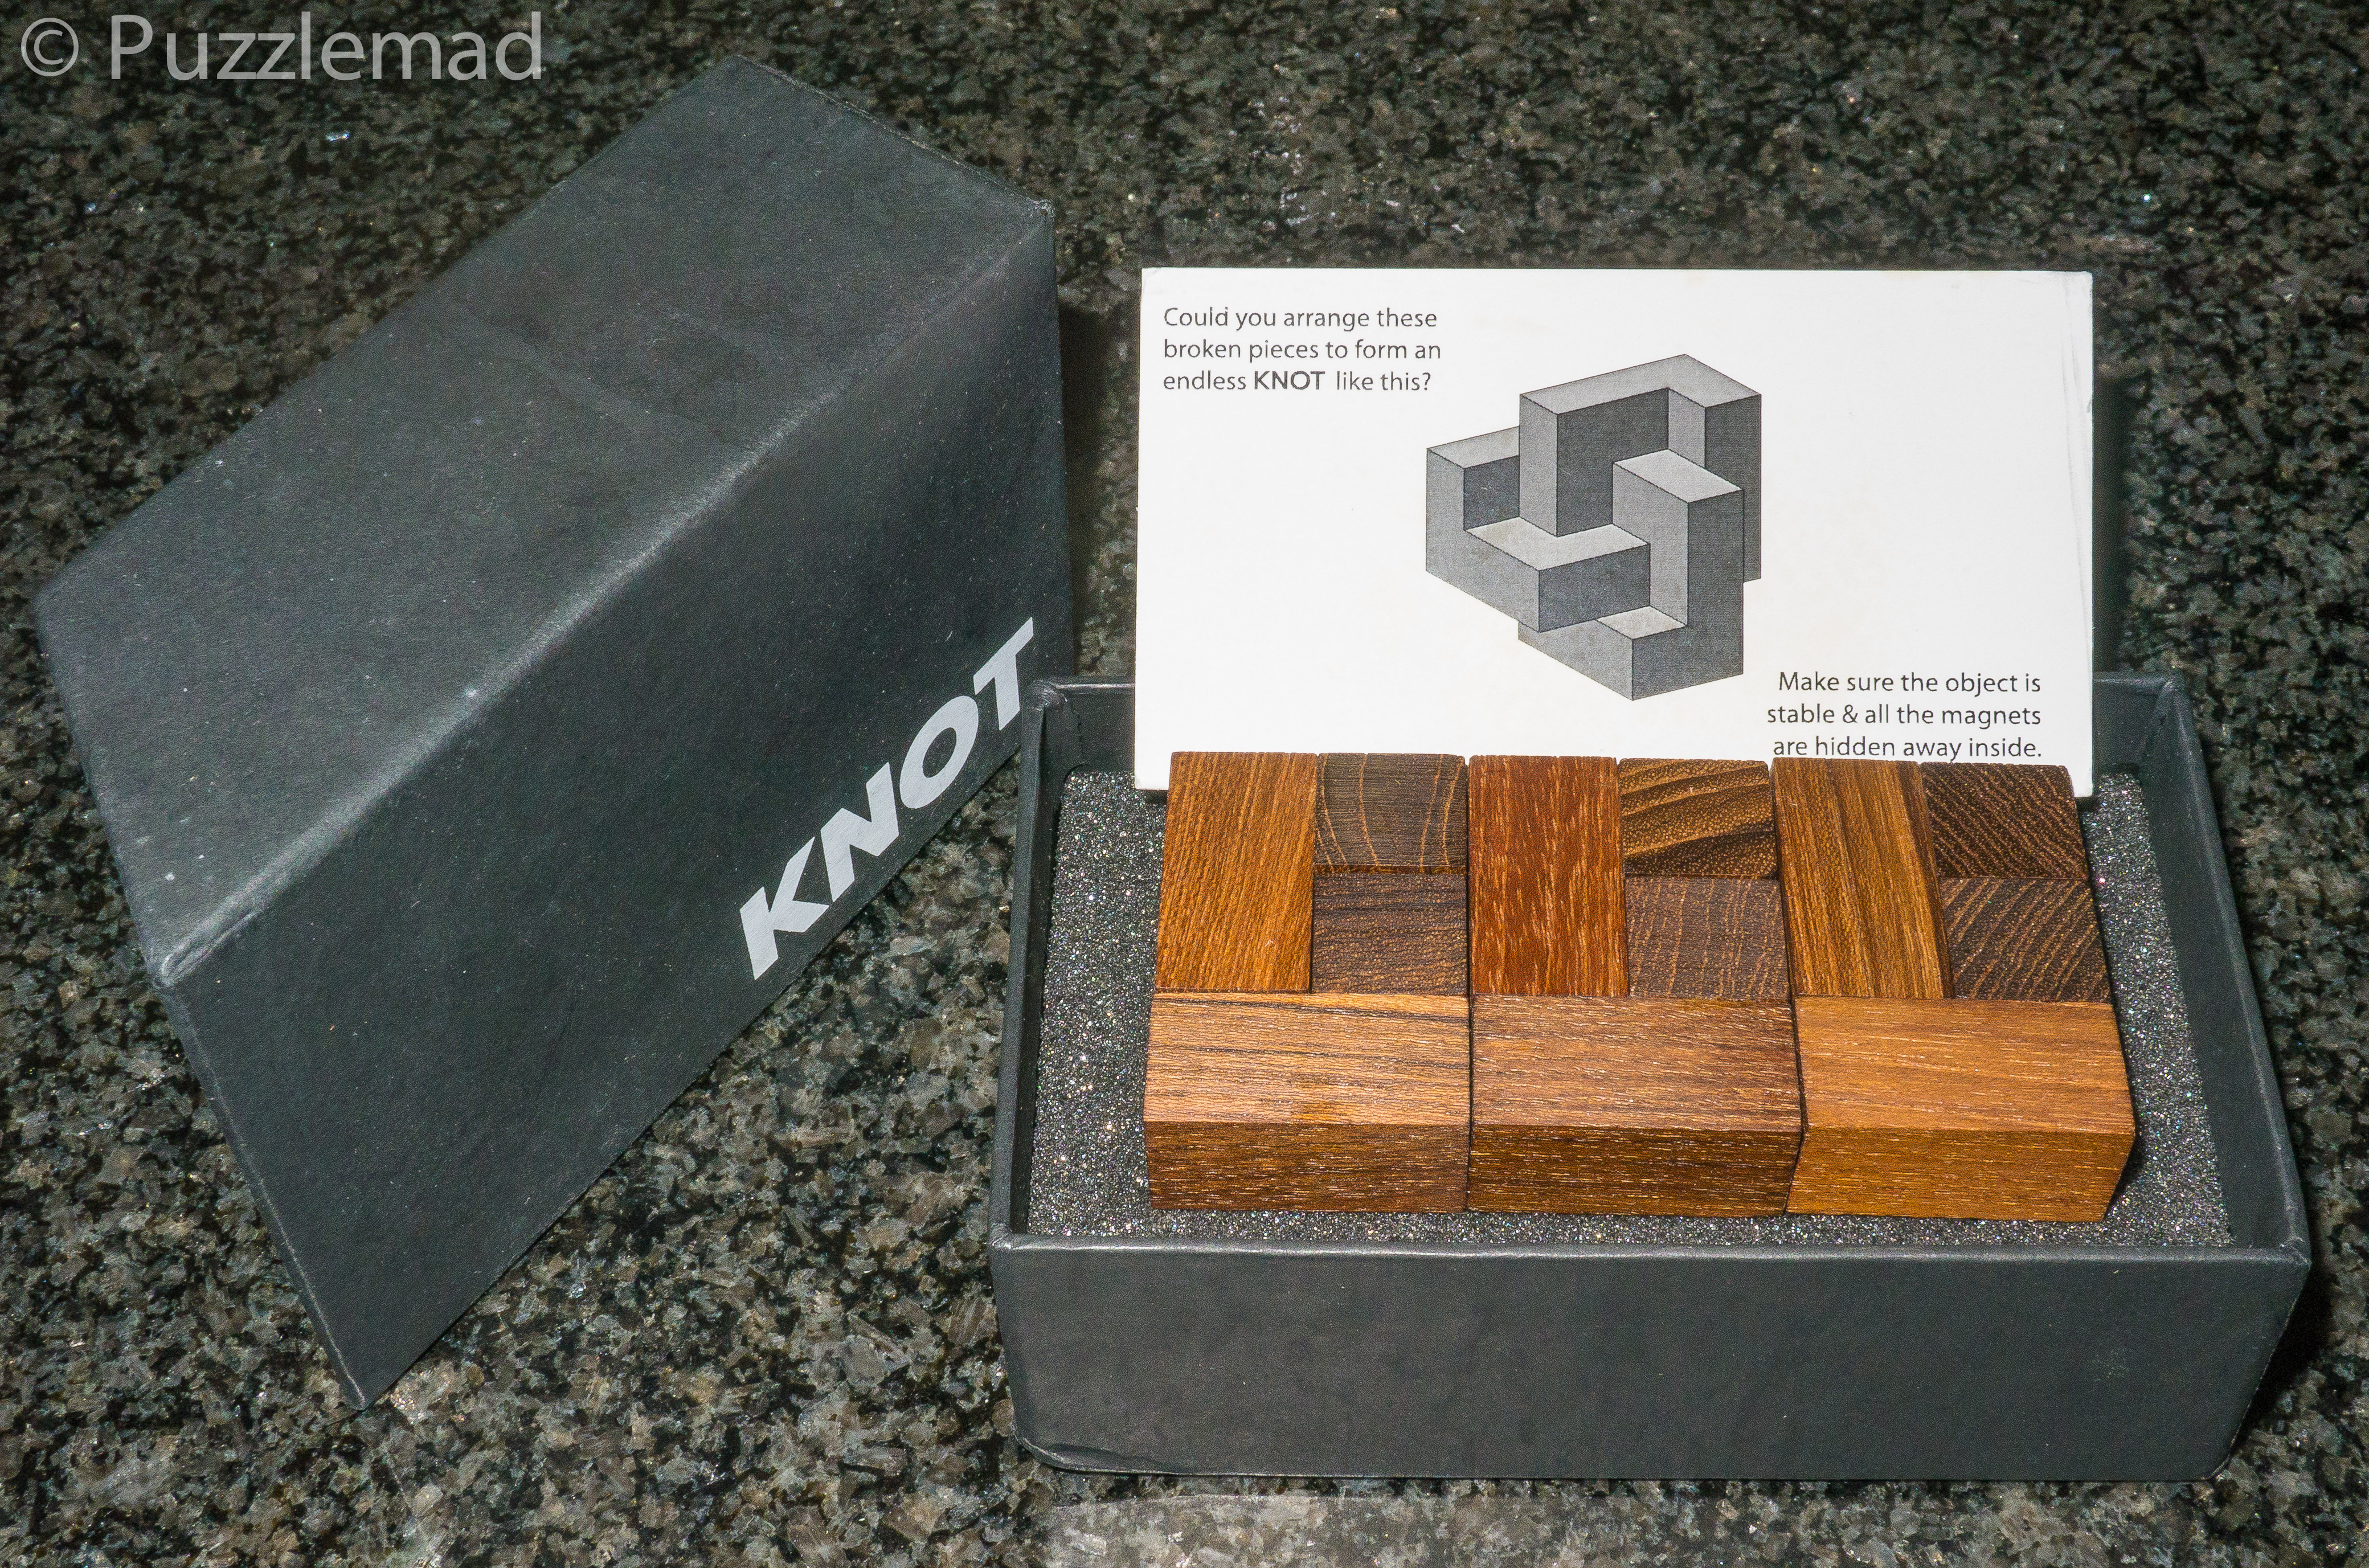
2 sets of chiral tetrominoes
Magnets in seemingly random positions
The Teak is well finished and the magnets flush with the surface. I was impressed. A quick inspection revealed that the magnets seemed to be randomly positioned and with odd polarity. Each piece was different. The name and the instructions say to assemble into a complete trefoil knot with everything held stable by the magnets whilst none of them are visible externally. Easier said than done for a puzzler who is terrible at assembly - destruction seems to be my forté.

Initially, as I do with most puzzles, I start with randomly trying things. Luckily, there’s a diagram showing the aimed for shape and I place pieces in a way to achieve that only to find that the magnets won’t match with each other or actively repel. At one point I did seem to be making progress but the last couple of pieces couldn’t fit together without one of the magnets being visible externally. Whilst this was actually quite a pleasing thing to achieve (at least I had the shape correct) but not having all the magnets connect meant that it was not stable. If I let go of any piece the puzzle was going to fall apart.

After about ½ hour of almost getting there, I realised that I had to be a bit more analytical. With 6 pieces, I could not keep track of what I had tried in which position and had to actually think a bit about directions and polarities. Once along this path, I made pretty rapid progress and had my solution in another 5 minutes. The Aha! moment was delicious and a photo was taken shortly afterwards.

Aha! A nice Knot
How should I store it? The box is so good that I have dismantled it and will be keeping it in the box for display. Interestingly, repeating the solve had to be done from scratch - there seems to be no way for me to remember the assembly. Don’t tell Mrs S that I could just solve this over and over again with no recollection of previous solutions.

This is well worth the $75 from NothingYetDesigns if you like a nice little assembly challenge. It is not yet available from PuzzleMaster.

Thank you Abhishek for the fun puzzling. I will look forward to the next creation from you.


Sunday, 10 September 2023

Thanks For The Fish!

Hokey Pokey Lock by the Two Brass Monkeys

What a week! Work was real busy but I had picked up a bunch of new toyas at the recent MPP and couldn't resist playing with a few of them at every moment of down time that I had. I have had quite a time with these and actually solved a few including the last 2 from the Pelikan delivery discussed at the end of August

Back in 2018, Big Steve and Ali had produced the Hokey Cokey Lock and it was Steve's exchange gift in the 2018 IPP and had involved dressing up and dancing (poor poor Derek!) - I reviewed it here. That lock is still available even if the one being reviewed today is currently sold out.

Poor Frank!

Needless to say, I absolutely loved the Hokey Cokey and was very fascinated to see what was new with the similarly named puzzle. I think that, at the puzzle exchange in the Jerusalem IPP, Steve and his poor assistant/victim, Frank spent a long day dancing the usual tune but this time using the American spelling to their dance and enjoyed themselves immensely. 

The puzzle arrived with instructions to open the lock and find the pun inside. There are 2 key on a keyring suitably adorned to celebrate the 30th IPP - there was a wine bottle seal sporting a snazzy 40 and a cork removed from the celebratory bottle.

First thing's first...you know it won't work but you have to try the keys in the lock. Yes they fit, no they won't open the bloody thing. Hmm, now what can I do? I did what was expected of me and was rewarded with a stern look from Mrs S as Steve forced me to make a mess:

Yes, I poured a bunch of little fish over myself and the sleeping cat!
I almost got away with it. It was the inadvertent F word that came out that gave away that something bad had happened.

The engineering here is top notch. I found the rest of the solution fairly quickly and managed to open the lock without much song and dance (than goodness) and let Steve know.

No spoilers here
Steve asked whether I had completed the second half of the mission. Alas, I have not managed to find the pun. I keep looking at it but word games are not my strong point.

Hopefully another batch will be produced and made available for you to buy. If you wish to purchase Ali's exchange puzzle - A Bolt from the Blue then that is available here as is Allard's stunning teeny brass burrset, the Allard's Think© sticks, you know that you can never have too many burrsets!! You might as well pick them both up whilst you are there!


I have a few solved puzzles under my belt for the next couple of weeks - Phew!


Sunday, 3 September 2023

Not All Disentanglements Are Wire Or String

Some Are Solid Plastic With A Box
Trapped Bird (photo from the design competition page)
A few months ago I managed to get hold of a copy of the Trapped bird designed by Koichi Miura (beautifully made by Mine). I ended up buying 2 different coloured copies of it because, like an eejit, I had not realised that the two versions being put up for sale were identical in function/solve (I got the one above plus another with a light beige box and a blue bird). The picture doesn't do the puzzle justice but I don't want to post my own picture in case it gives too much information away.

I could not resist it - it is really cute and I thought would be a nice easy solve before working my way up to the more difficult puzzles from that delivery. I was really quite wrong - I had thought when I bought it that it might be a bit like the Hedgehog in cage puzzles but no, it is actually a disentanglement puzzle but with a central piece to be separated from the frame (box). I lurve disentanglement puzzles and a new idea in the genre was very pleasing. There is a nice sequence at first which is easy to find but very quickly, there are decisions to be made and some moves are distinctly not intuitive or easy to find. 

To my surprise, it took me a good 45 minutes to free the bird after which, I took my photos (I of course did it with both copies so that I had a nice pic with both colours for my database. At that point, I put it back together again...except I couldn't! About 5 moves in to the reassembly I was stuck at a dead end. Now, that was very unexpected and caused a minor panic for a while whilst I freed the bird again. It was time for some think©ing and it hurt quite a lot. I actually failed to do it that evening and had to try again the following day. After a good 30 minutes of work, I realised what I had been doing wrong - the design by Koichi-san is very clever. he has made it perfectly to mislead you into following the wrong path and missing the correct one. It really is not easy to find it once you have taken the wrong way - it upsets your perception and has a lovely Aha! moment when it is finally restored to the start position.

To prove it is possible
Phot from Mine's FB - not giving too much away
Interestingly, despite knowing about the false passage being present, it catches me almost every time I dismantle the puzzle. The design is perfectly made to lead you astray even when you are expecting it. I can see why it was successful in winning a Jury Honourable Mention award in the Design competition this year. I have noticed at yesterday's MPP that when this puzzle is attempted by people who are not particularly interested in disentanglement puzzles, they seem to idly fiddle with it but have a very low threshold for abandoning it and their interest waned quite quickly. Indeed, on several occasions people got stuck very fast and instead of working at it they gave up and I had to return it to the start again.

Personally, I agreed with the Jury at the IPP, it is definitely worthy of an honourable mention rather than a first prize but certainly that mention is needed. What did I do with my second one? I thought it would be a fitting gift to Dale at the MPP yesterday - he is a big disentanglement fan and has given me a number of toys over the years so time to repay.

Sunday, 27 August 2023

Pelikan Will Keep You Puzzling For A Long Time With These

Coming very soon from Jakub and Jaroslav's Pelikan Puzzle store

At the end of last week, I took delivery of a lovely new batch of puzzles that are due to be released from the Pelikan puzzle store within the next week. I have to say that this bunch are incredibly challenging and will keep even the best puzzlers playing for a considerable time. Here we have, starting at the back left:

Paternoster by Alexander Magyarics
Mustang by Alfons Eyckmans
Lange Vinger by Alfons Eyckmans
Der Kreis ist Blau by Volker Latussek
Dunant revised edition by Volker Latussek
King Box by Osanori Yamamoto
Crab by Pelikan

I have had yet another very long work week and have not managed to solve them all but have something to say about every one of them which may help you make a decision on what you should buy (you definitely want a few of these!)

Crab

Crab designed by the Pelikan team
I had to start with this one! It is just so cute! It is stunningly made from Bubinga, Wenge and Ash. Thos one continues the line of the animal themed puzzles that Jakub and Jaroslav are producing from their own designs (I don't actually know who is responsible for the actual design of these). So far we have had Turtle,Snail, and Ladybug. All of these have been Kumike style puzzles that are interlocking rather than burr puzzles and have required less in the way of sequential move exploration as many of the burr puzzles have. I was sort of expecting something along those lines but very quickly realised that this is actually a framed burr with the exoskeleton of the crab being a frame and the main body being the burr sticks...Except these are not traditional burr sticks - some of them are hooked. 

The exploration of these is great fun with only a few short blind ends and some really interesting moves. I did get stuck for a little while towards the end of the first piece removal because I was not looking at it properly but found my way after a short break. After a short break I had my first piece removed and then the rest were removed relatively easily after that - the level given to me by Burrtools is 19.6.3.3.2 which is perfect for me:

A burr with some rather interesting pieces
Having done my usual to and fro approach to the disassembly and retained the orientation of the pieces as they came out, I was even able to reassemble it all the way to the beginning from memory giving me a huge sense of achievement. I think that if the pieces were scrambled then only the very best of you would be able to manage this assembly from scratch.

King Box

King Box designed by Osanori Yamamoto

As soon as I saw this, I wondered whether I had seen it before (don't tell 'she who must be feared' that I don't remember my previous puzzles) and, indeed, I have reviewed this way back in 2018. Pelikan and produced a little brother to the King box called Wing Hanger which I absolutely loved and found it very similar but simpler than the King Box which had been produced by Tom Lensch.

This version is made using Wenge, Padauk and Elm and is stunning. The checkerboard pattern on the end of the 2 pieces will make it easier to reassemble but could make it more confusing to work out the orientation. The two sticks dance around each other multiple times, going in and out of the box as they gradually work their way out. In the end there are just 2 simple burr sticks and a box that has several windows in it. 

Simply gorgeous and fun
Having removed the pieces, I scrambled them and left them for a couple of days. I had no real memory of the assembly and had to work it out from scratch (just as I had done in 2018). I actually found that whilst the checkerboard pattern was sort of useful, it did mislead me for a little while and I spent a happy half hour trying to assemble the puzzle with the sticks the wrong way around. There was a nice Aha! moment when I realised my mistake and assembled the puzzle again.

Paternoster

Paternoster by Alexander Magyarics

We have not had one of Alexander's cubic packing puzzles for a little while and this one is a stunner both for the tremendous design as well as for the incredible workmanship that has been put into this one by Jakub and his team. It has been made with a Mahogany box with 3 Wenge pieces inside which completely fill the cross shaped entrance. The truly special thing about this is that it has a moving part - a whole corner of the box ascends and descends like a lift (elevator to you Yanks) and hence the name Paternoster. To the right you can see the ascending segment.

However, whilst the name is very clever, I really think it should be called "scares the crap out you" because this is what it did! Initially I did not know how many pieces there were inside and quickly discovered the first moves in the removal sequence. That movement of the corner section is really satisfying and smooth. It shows off the superb accuracy of the Pelikan craftsmanship. I moved the corner and one of the pieces and realised that what was inside could now move as it slid without me realising it. I then was unable to return the puzzle back to the start position! Aaaargh! I spent a fairly frenzied half hour or so desperately trying to reset the puzzle with a sinking feeling in the pit of my stomach. I put my fingers inside and moved pieces in various directions and found a partial rotational move. OMG! What if I had rotated a piece without realising it? Eventually, with my heart pounding, I reset it and put it down for a while. This was going to be really tough. Having screwed my courage "to the sticking place", I tried again and yes, I did the same thing again - I was stuck! Another half hour and it was back but without me really understanding why it was back. The third time I did it again but instead of panicking and returning to the beginning I decided to continue to try and dismantle it without really understanding what was going on. I found several more movements that may or may not be useful and gradually worked the pieces out. This was a really interesting exploration which did not really leave me with an understanding of the puzzle. When the final piece came out, I was very relieved but had a huge sense of achievement from just a 3 piece puzzle. It's a packing puzzle and I hadn't even packed it yet!

Three piece packing puzzle - soooo difficult
At this point, I could see that it was "just" one of Alexander's 3x3x3 cubes to be assembled in a box with obstructions. I say "just" because I had no real idea of what I had done to take the pieces out and so packing them in was just as hard. Yes, yet again, I got the bloody thing blocked up again several times before I finally got it reassembled. This creation from Alex and Pelikan is stunning!

Lange Vinger

Lange Vinger by Alfons Eyckmans
Alfons specialises in fabulous burr designs. They are all very beautiful and many of them are incredibly tough. This is definitely the case here - the two burrs that have been designed and created are stunning and are extremely difficult puzzles. I think that the disassembly is hard enough - the reassembly will be absolutely impossible without Burrtools. The Lange Vinger is yet another of Alfons' incredible framed 6 piece burrs. This burr is made from Wenge with Lime pieces. It has an odd rotational symmetry to it which really throws my ability to follow moves. The frame pieces have been made so that each one of the main burr sticks is blocked at one end making the disassembly much more complex. I started working on this after the previous ones and was aware that I did not have much time to get it done before the review was due. Previous puzzles have mostly had the frame interfering with the burr stick moves but ultimately the 6 piece burr is mostly dismantled from within the frame until quite late when frame pieces can come out. I spent quite a while working with this thought in mind before realising that this wasn't going to work and then concentrated on trying to move the frame pieces. I think I got lucky on several occasions because I found some very hidden moves that suddenly allowed a frame piece to move sideways and then another axially which freed up a whole lot more movement. 

This took me quite a few hours to dismantle and I was very lucky to do so. The amazing thing about it was that the whole frame came off the burr leaving all 6 pieces in place before they were disassembled. There are a lot of pieces:

6 burr sticks plus 12 frame pieces
It is NOT a puzzle for a burr newbie - it is very tough with a level of 20.2.4.1.1.3.4.2. It was great fun using Burrtools to reassemble it again.

Mustang

Mustang by Alfons Eyckmans
This glorious looking burr designed by Alfons has been made from Wenge and Acacia. It is another framed 6 piece burr but, unlike Lange Vinger, it is symmetrical and there is a LOT of possible movement in the 6 central burr sticks. I spent a considerable amount of time going round in circles trying to find a way to make the 6 piece burr begin to disentangle and could not for the life of me find a way to do it. I then figured that the frame possibly would come apart around the burr and attempted to find a way to make space to move a frame stick. I could not do that and had to admit defeat. I had to get the Burrtools file from Jakub and had a look at it to get me started. To my horror and delight, I saw that this was a significantly difficult level at 41.11.9.1.1.1.3.2.1.2.3.2! There would be no way that I would manage to dismantle this without help from Burrtools in the small amount of time allotted to me. I used the file to remove the first two pieces and then proceeded to try to get the rest apart by myself. Even this was a tough challenge as finding the next 9 moves to remove the third piece was very hard. I did manage it eventually and then the rest of the disassembly was a nice sequence. The puzzle remained stable for quite a while before dissolving into a pile of pieces on my lap. 

I haven't yet assembled this - it will be a challenge!
This is another brilliant design that has been perfectly brought to life by Jakub and Jaroslav. It is one of the toughest burr puzzles that they have ever made and is definitely only recommended to burr experts or enthusiasts with a penchant for punishment.

Dunant Second Edition

Dunant 2nd edition by Dr Volker Latussek

When I unwrapped this one, I was almost certain that I had seen it before and then I looked at the name on the box which confirmed that this was one we had seen and loved before. In fact, the first edition, along with with a few others made the top 3 of my best of 2019 list. As soon as I removed the pieces from the initial position, I could see that this new version was very different. 

I have not yet had time to play with this one but Volker knew that it was coming and sent me a little explanation of the rationale for it:
"Playing with C-shaped pieces a few years ago, I discovered their wonderful properties and so HARUN was initially designed. Here, the C-shaped pieces consist of three 2 x 2 x 1 squares joined together and an open 5 x 5 x 5 box. Similarly, DUNANT was born from the idea of developing something from a small number of identical C-shaped pieces, each consisting of three 3 x 3 x 1 squares to be placed in a restricted box. In the end, there were 5 pieces and a 5 x 5 x 8 box with a 5 x 5 square opening through which a red cross is visible. It was named after Henry Dunant, the founder of the Red Cross. Unfortunately, I could not position the opening centrally...

With the current release of DUNANT 2ND REVISED EDITION, I have retained the construction principles of DUNANT but abandoned the integer dimensions of 1, 3, 5 and 8. The red cross now looks centred in the box. I hope that the new DUNANT is both easier on the eye and that the path to the solution still feels good, and perhaps that it will inspire you to read about the impressive and harrowing life of Henry Dunant, the first Nobel Peace Prize winner."
I cannot wait to have a proper try with this - if it is anything like as good as the first edition then it is bound to end up in my list for best of 2023!

Der Kreis Ist Blau

Der Kreis Ist Blau by Dr Volker Latussek
(except here is is rot)
This fabulous packing puzzle is another of the amazing creations from the warped mind of Volker Latussek. I removed all the pieces and was very surprised to see no blue cross before realising that Kreis means circle. These pieces are prisms made from six of the fundamental geometric shapes. I was still mystified that it was red but apparently blue wood is kind of hard to come by so Pelikan chose the vibrant Padauk for the circle as well as Acacia and Beech for the other pieces and the box. The box is Volker's standard lipped box which has been very precisely designed and made to just fit the pieces with sliding room only. Rotations will obviously be needed but I have not yet had time to play with this. I suspect that it will be VERY difficult! 

Volker sent me his reasoning behind this puzzle:
"Wassily Kandinsky and most of the teachers at the Bauhaus assigned the colour blue to the shape of the circle. Pelikan nevertheless followed the assignment of Oskar Schlemmer, another highly esteemed teacher at the Bauhaus, and chose the colour red for the circle. A visit to the new Bauhaus Museum in Weimar is well worth the trip for fans of craft art and architectural history, and for me it was a great stimulus to think about polygons: triangle, quadrilateral (square), pentagon, hexagon, octagon, and circle and how they could be packed into my typical box. As with FERMAT, the triangle is full of surprises and so I wish you a long journey of discovery as you play with the polygons.

And if you do manage to pack the six shapes under the lips, you will have learned a lot from this play of shapes, especially when the circle is in the top layer.

DER KREIS IST BLAU (THE CIRCLE IS BLUE) is my first homage to the Bauhaus (1919-1933)."
I am sure that most of you will find this one an essential purchase. Good luck with it!


Sunday, 20 August 2023

Scramb L Was Less of a Strugg L

Scramb L by Junichi Yananose
Beautifully made from Iroko, with the protrusions crafted from Jarrah and Bamboo, and the box constructed from American Cherry and bamboo plywood. It is a nice solid 100x100x64mm in size.

Scramb L and Strugg L
I jumped on the order for Scramb L as soon as possible. Juno made it available to IPP members who had bought multiple of his puzzles before and I just couldn't resist. The Strugg L puzzle had been a wonderful new development in the packing puzzle genre having relatively simple shapes to be packed into a box but with no limits to the opening of the box. The limits had been created by the use of pins and tracks between the pieces and also in the walls of the box. With this new one, Juno had removed the externally visible grooves and it looked like a very simple packing puzzle. Only when you make the second of the possible moves do you realise that there is something special in this puzzle:

There are rails and tracks!
I had been expecting more pins and grooves and was quite taken aback to see the rails here. This made the blurb on the product page make sense:
"The design of this puzzle involved battling against shortcut solutions caused by unintended piece rotations. To prevent the pieces from rotating, Juno added protuberances and grooves. Still, unexpected movements occurred, and the pieces came off with fewer moves. Such unforeseen rotations were discovered even when the puzzle's manufacturing was nearly 70% complete, and leaving it unresolved would significantly compromise the puzzle's enjoyment. As the boxes for the puzzle were already glued together, it was impossible to add grooves internally. Juno addressed the issue by further modifying the shape of the pieces to deter rotations."

There are pins and grooves inside this puzzle but they allowed movements that Juno did not want and thus he had to be more radical in the design of move limiting pieces. The rails and tracks are a very interesting design and once you have dismantled it, then you will also see that there is an extra feature of the rail to prevent a piece sliding off the end. I don't think I have ever seen this sort of thing before.

The disassembly did not take me very long (about a ½ hour) but was a delight to explore what was and wasn't possible. At several points, it looked like there might be a rotational move but the careful design of the various pins and rails worked to prevent any unwanted moves. I had a nice pile of pieces for my obligatory photo and then stuffed them all into the box and left it for a week to see how tough it might be as an assembly/packing puzzle.

Only 5 simple pieces
This will help me forget the assembly
After a week I had mostly forgotten the moves to reassemble the puzzle and set to trying to rediscover it. The presence of the rails and tracks made it considerably easier to assemble my cuboid shape outside the box and then aligning the shape with the grooves in the walls of the box was easy. At this point, I had to dismantle the cuboid and then reassemble it in the box. I had successfully forgotten a critical move and did Strugg L to reassemble the Scramb L'd pieces but only for about an hour. This was a good bit easier than its' predecessor but nevertheless, quite fun to do.

Who knows what Juno is cooking up for us next? I can't wait to see it. He and Yukari are taking a well-earned break for a few weeks before getting back to the hard business of providing us addicts with new toys.


Sunday, 13 August 2023

I Have a Parasite

And it affected my brain! (no I am not Venom)

Parasitic Burr by Tyler Hudson from Cubic Dissection
I am so delighted to see that the guys at Cubic Dissection are continuing Eric's legacy by producing puzzles that are both interesting and fun to solve (not just incredibly tough or high-level) and also stunningly made. This burr is definitely both of those. The level is just a level 3 to remove the first piece and then it comes apart sequentially and this might make you think that there is not much fun or challenge to it. The pleasure of a puzzle is far more than the number of moves - I have never managed to solve my SuperNova or Tiros burrs and don't actually enjoy trying to solve puzzles like that. The incredibly high number of moves required makes it less than fun. This level 3 puzzle is sent out as an assembly challenge and is just the right difficulty level. It really hurt my tiny brain.

It was available in two different versions (unfortunately sold out now) and I chose the 3 (4) colour version made from Maple, Purpleheart and Jatoba, with Black Limba parasites. Whilst the other version (Jatoba and Ash) was stunning, I figured that since I was so terrible at assembly puzzles, I would need the extra help provided by the colours of the pieces. 

A few burrsets!
Yes, I know that it is "just" a six-piece burr with some extra pieces added but that "just" is unnecessary. The TICs are "just" interlocking cubes but that doesn't make them less of a challenge or less fun. The pieces have been beautifully made with nice chamfering both externally and internally. One of the complaints that many of us had over the years was that Eric would never add internal chamfering to his burrs and this could often make solving them very difficult because the movements sometimes were too difficult to get started due to edge catching. This puzzle has a teeny tiny chamfering internally and this means that the moves are just possible as long as the pieces are lined up. My first aim was to assemble the burr. I have a LOT of burrsets in my collection and to my eternal shame have to admit that I am absolutely terrible at assembling 6-piece burrs (I stand no chance at all with the 18-piece set!) I have known it to take me a whole day to assemble just one burr from some of them. I love them but am rubbish at them.

I fully expected to need to resort to Burrtools for this but I really did give it a try. It actually took me a week of play to assemble a 6-piece burr and then I had to find a way to insert the parasites (as a medic, that sounds very wrong!) The problem for me was that there were several ways to assemble the burr and working out which way to place the extra pieces nearly caused the parasite to eat my brain. I realised that the burr could be created with two different external results for the colouring i.e. chirality and each of those chiral structures could be disassembled in more than one way. That first week of play had assembled the puzzle the wrong way and it took me the best part of another week to realise that there was no space inside for the extra pieces. I am not very good at visualising inside things blind. At the end of that second week of failure, it dawned on me that I could not find an assembly with all 8 parts and there must be another way to put the burr together. Sigh! At least this was making the puzzle very good value for money.

In the third week of play, I finally found another assembly that did not have visible external holes and noticed straight away that there was space inside for the 2 identical tetrominoes to fit inside. And here I got stuck for a VERY long time! I knew where they went but every time I tried to put them inside, I was blocked. There are 4 different assemblies of the burr in this chiral form and 3 of them have space for the parasitic pieces. However, only one of the assemblies is achievable. I discovered this retrospectively this morning using Burrtools to model the puzzle and the different colour scheme variants. In retrospect, I realised that I actually found the correct assembly the first time but could not get it to work.

The interesting thing about this challenge was that I got stuck on the movements because of the parasitic paralysis of my little grey cells. When assembling the correct burr shape there are several assembly methods when not using the tetrominoes. I got completely fixated on one particular assembly/disassembly method and no matter what way I placed the extra pieces, I just could not find my way past that assembly. Finally, on Friday night whilst chatting to Derek, I realised I needed to think outside my brain and maybe try the same assembly but look for a different sequence to achieve it. 

Trust me, the parasites are inside.
It took me over 3 weeks but I finally got there and feel really chuffed to have done it without using BT. Of course, using BT afterwards to complete my analysis was also a lot of fun. It did reinforce to me that I was completely right to buy the coloured version as the non-coloured 6-piece burr has 132 different assemblies with 68 of them having an achievable solution. If I had chosen that one then I would still be trying in several years. 

Thank you to Tyler for a great challenge of just the right difficulty level and thank you to the team at Cubic for continuing Eric's legacy.