|
|
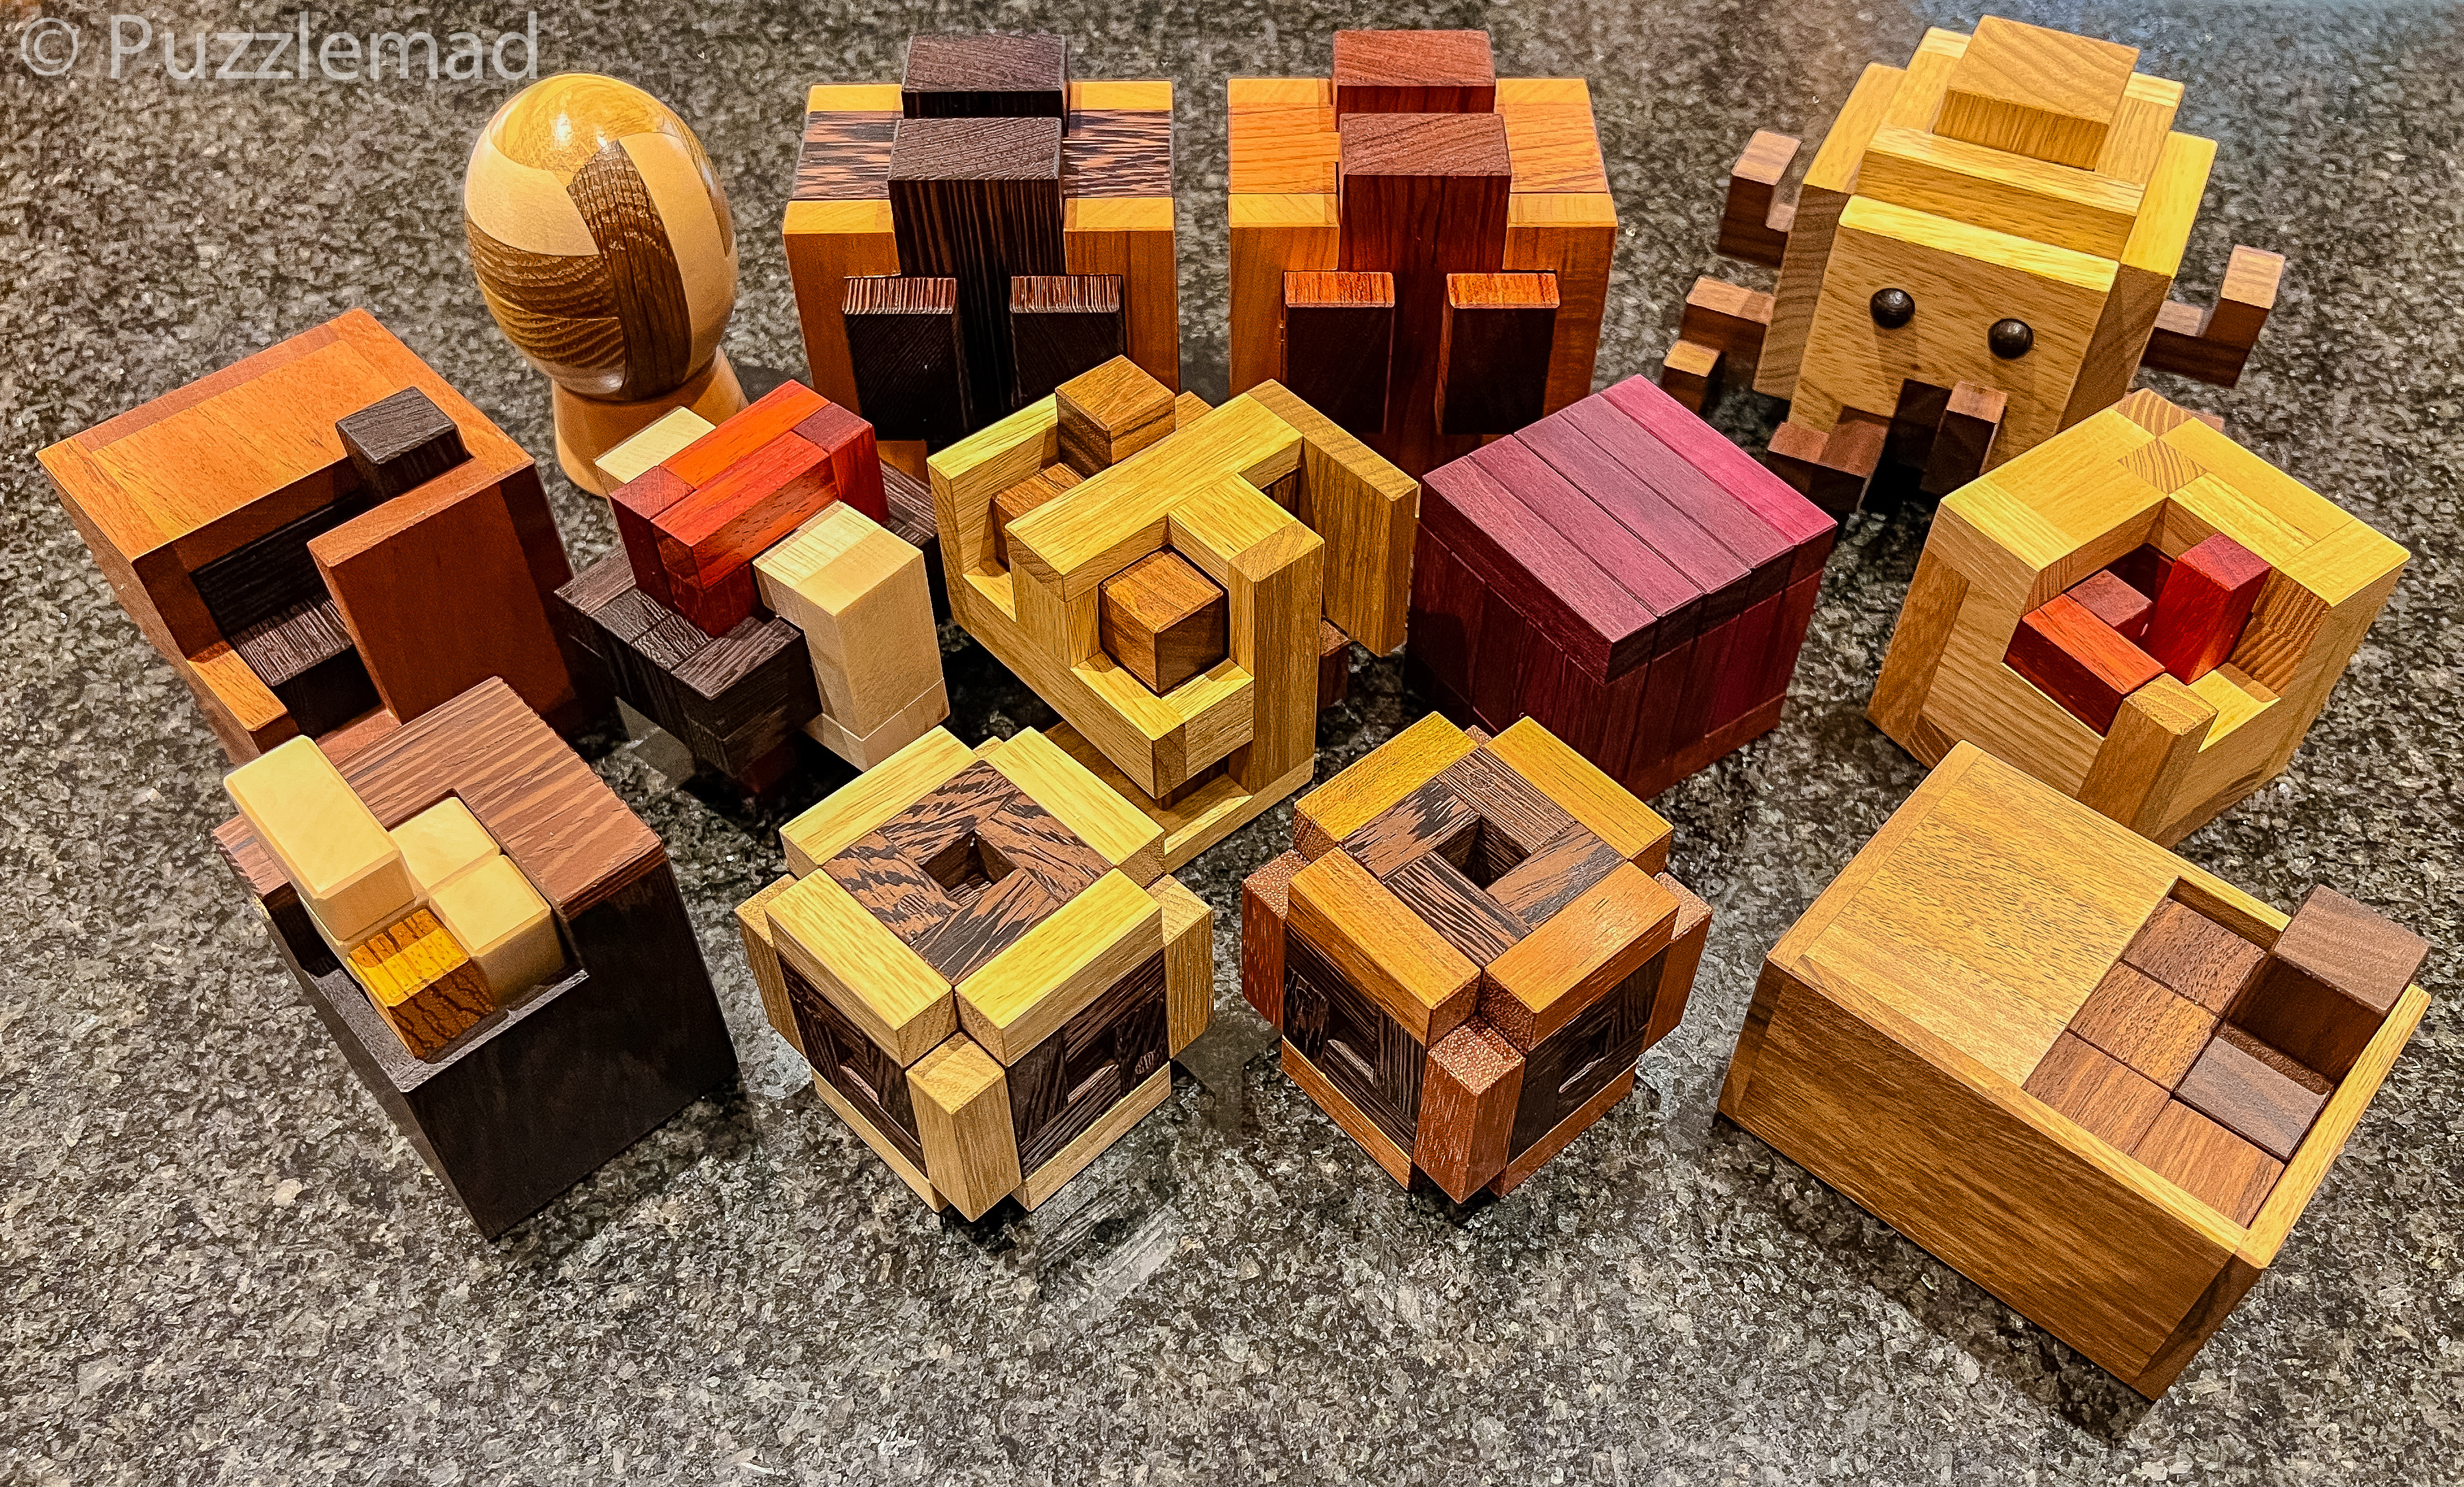
The biggest bunch of Pelicans ever!
|
From back left:
Egg - Pelikan (mixed woods)
Hooks - Alfons Eyckmans (Wenge & Cherry or Bubinga & Cherry)
Octopus - Pelikan (Limba, American Walnut and Wenge)
Infinite - Alexander Magyarics (Mahogany & Wenge)
Captain Hook - Alexander Magyarics (Maple, Wenge & Padauk)
Tigridia - Alexander Magyarics (Limba & Ovangkol)
Gem - Osanori Yamamoto (Purpleheart)
Den 3 - Osanori Yamamoto (Acacia & Padauk)
Waltz - Osanori Yamamoto (Wenge, Maple and Zebrano)
3 Piece Burr Flower - Osanori Yamamoto (Wenge & Limba or Wenge &
Jatoba)
Dick-Flop - Dr Volker Latussek (Walnut & American Walnut)
In no particular order but mostly the order I worked on them or solved them
in:
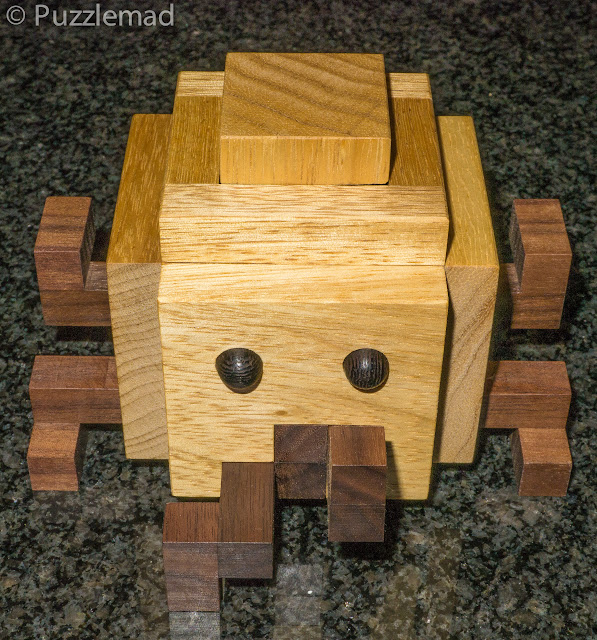
Octopus
|
|
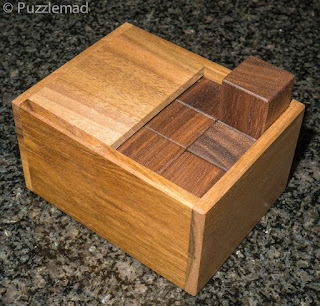
Octopus complete with 8 tentacles!
|
It seems that no new Pelikan release is complete without one of their own
designs, beautifully visualised as some kind of animal. We have had Turtle,
Snail, Ladybug and Crab so far, all of which reside on display in my living
room. The arrival of the Octopus in the PuzzleMad asylum/loony-bin was greeted
by me with a whoop of delight and by Mrs S with a groan of "Oh no, not more!!".
She did admit that it was very beautiful.
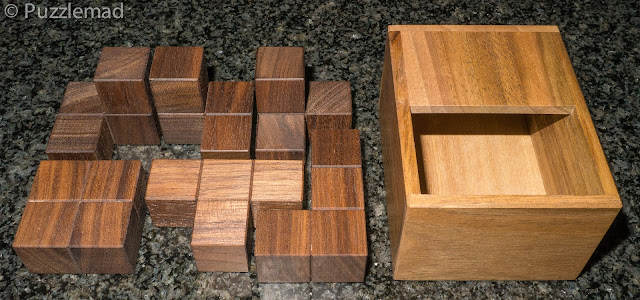
This was the one I began with because it's just irresistible. It's pretty big
at 13.3x13.3x9.8cm and made of Limba, American Walnut and Wenge. The beady
eyes just look at you. Like the crab, it is not just a simple slot together
Kumiki puzzle. It is a burr with pieces that interlock in all directions. It
all fits beautifully together and the first sliding move is easy to find but
after that it gets more awkward. I was able to remove the first two pieces
quite quickly and realised that I had not really paid attention to the
orientation they came out - the shape of them meant that they rolled off the
cat who sleepily acted as my tabletop. Having realised I was going to be stuck
soon, I just proceeded with the disassembly. Usually after half the pieces of
a burr have been removed it suddenly gets easier but not with this one. I
really struggled for another 20 minutes to find the way to remove the final
pieces. The main challenge with this will be the reassembly after scrambling
the pieces. I almost gave up and went to Burrtools but luckily before I lost
the last remnant of my mind, I finally found the correct assembly.
This puzzle is an essential purchase if you collect Kumiki type puzzles or if
you have the rest in the series. For the rest of you it's worth getting
because it's adorable and very clever.
Egg
|
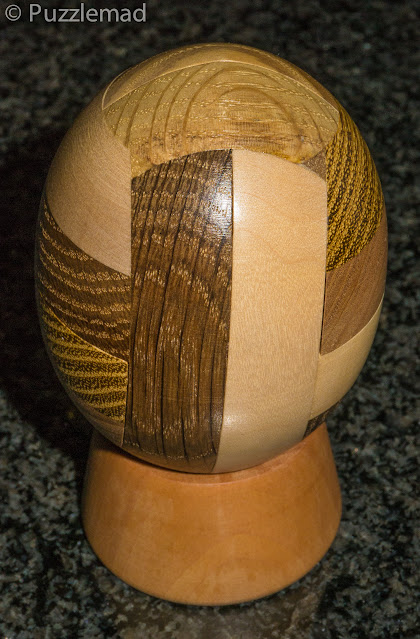
| Egg by Pelikan |
I had to check with Jakub about this one as it looked familiar but I barely
remember yesterday, let alone something I saw in 2016. This is a re-release
using European woods of the beautifully turned Egg puzzle. It comes complete
with its own lovely turned stand. These puzzles from Pelikan are wonderfully
tactile things to hold and caress. The egg is
NOT coordinate motion like
some of the other spherical puzzles made previously. When it comes to
disassembly, the puzzle is not particularly difficult - it is just a matter of
finding the correct places to put your fingers to hold it and and push/pull in
the right directions. It is not immediately obvious where to put your fingers to
do it and it is so wonderfully smooth that you get no clue from running your
fingers over it. If you have it just right then you are rewarded with a
beautiful sliding motion as it smoothly separates. After a few minutes you have
four pieces which look nearly identical and which will only fit back together in
one way. Re-assembly is just a matter of thinking it through. This is a joy to
fiddle with and looks lovely on display.
Dick-Flop
|
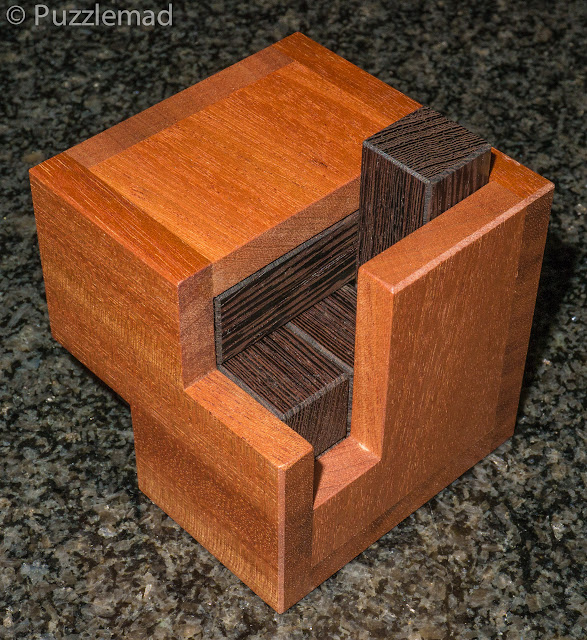
Dick-flop by Dr Volker Latussek
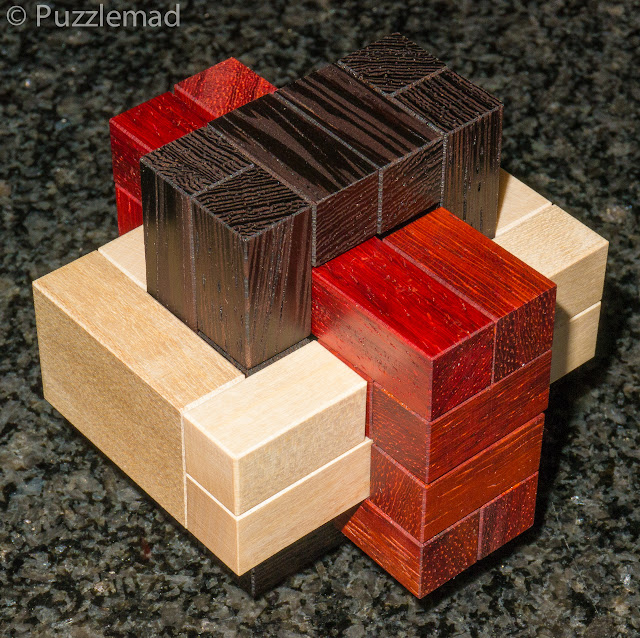
It's just 6 tetracubes from the
Soma cube
|
Here we have another masterpiece from the warped brilliant mind of Dr Volker
Latussek! This is what he had to say about it:
"When Dick Fosbury died in March this year, I had no idea that I would
find a small series of packaging puzzles and name them FLOP after the
high-jump technique named after him. A sports journalist ran the headline
"Fosbury Flops Over Bar" after his 1968 Olympic win, comparing the jumping
style to a fish flipping onto its back and curling its body after being
caught."
DICK-FLOP with its six tetracubes follows FRITZ-FLOP with only five pieces.
The boxes are each completely filled and the opening is restricted so that
some of the pieces have to flop out of the box. This is the fourth in
his Flop series in which he takes a subset of the standard Soma cube pieces
and insists that we stuff them into one of the standard shape challenges that
come with the Soma cube. Except.... he makes it much more fun by making us do
it into a box through a limited entrance hole. And then, not completely happy
with that restriction, he ensures that the entry hole is not a whole number of
voxels wide which forces some very interesting and difficult to find
rotational moves on the non-planar pieces. It looks like the entrance is 2mm
too small to allow two voxels through.
The assembly configuration (Volker always stipulates the assembly shape)
is a "near miss" and when you take the pieces out of the box, you get a small
hint at the deviousness of that man! Some of the moves just to get the pieces
ready for play need them to be perfectly placed before it can happen. The
incredible precision of the manufacture by Pelikan is simply stunning - when
some of the pieces move and you can almost feel the suction holding them in
place as the tolerances are perfect to a tiny fraction of a milimeter.
A quick play with Burrtools told me that there are 78 possible ways to
assemble a 2x3x4 cuboid from the pieces provided and I was definitely going to
struggle to try them all from memory. I then scrolled through them to find
only the ones that have a planar piece arranged vertically along the end (i.e.
it can be dropped in last) and after about 15 I stopped counting and decided
to peek with squinted eyes at the solution. I just managed to restrict my view
to 2 piece positions in the end shape and from here restricted the number of
assemblies to be tried down to just 3. I was rather surprised at one of those
piece positions that I had peeked at but it really helped me. Even having just
3 assemblies to choose from, actually getting them inside the box was still a
massive challenge. It took me about 3 days!
This puzzle is an essential buy for anyone enthused by packing
puzzles or the Soma cube. It has been stunningly created by Jakub and team and
will be a huge challenge to any puzzler. The Aha! moment is wonderful.
The Fritz-flop and Soma-flop are still available from the Pelikan website and
you should definitely buy the whole set for an amazing challenge!
Captain Hook
|
|
Captain Hook by Alexander Magyarics
|
Captain Hook is a very interesting board burr made from Maple, Wenge &
Padauk. The tolerances are absolutely perfect - this puzzle slides so smoothly.
It is something quite new from Alexander Magyarics, whom I am beginning to
wonder whether there is anything he cannot turn his hand to and master. I know
that you are all familiar with his amazing 3D and 2D packing puzzles and he has
designed a few burrs with frames or boxes over the years but I am not aware of
any board burrs from him. This looks very like a standard 6 piece board burr
when viewed assembled but within a few moves it quickly reveals that it is not
what it seems. The movements are interesting and in one case a little unexpected
with a very nice pathway to be found. No big blind ends to get caught in and
after 10 moves the first piece can be removed. After that 2 moves each for the
next 2 pieces and the fact that it is a 5 piece board burr is revealed. I don't
think I have ever seen one before. I tried to reassemble it immediately after I
had taken it apart and, whilst I had memory of the relative positions of the
pieces, there was a critical tricky step that I could not achieve straight away.
There is a very well hidden essential move to allow the disassembly and
reassembly and if you haven't memorised it then it will cause you to think© for
a moment.
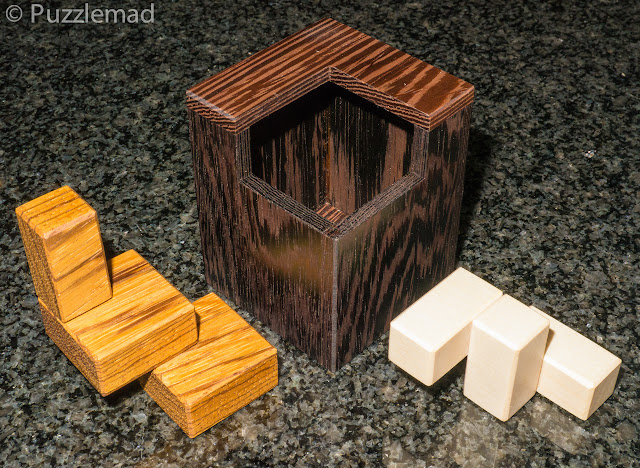
Infinite
|
Infinite by Alexander Magyarics
That left side when viewed straight
on looks like an infinity symbol
|
Here we return to classic Alexander Magyarics and it is really, REALLY,
REALLY good! It is a beautiful packing puzzle made with a very
chunky Mahogany box and just 3 lovely Wenge pieces to be packed. Just 3 pieces?
They aren't even that complex! How hard can it be? Oh boy! This is a
TERRIFIC challenge. The entry-ways into the 3x3x3 voxel box are quite
restricted and must be completely occluded once packed. In fiddling with the
pieces I was able to find quite a few arrangements of the pieces into a 3x3x3
cube but none that I found would fit through the openings.
|
| Not solved but fun |
Retrospectively, I found 59 cubes with the relevant solid areas using
Burrtools but this was unknown to me at the time. Usually I start outside the
box and find the required shape but there were too many possibilities and I
needed to combine the very restricted entry requirements with my assemblies to
narrow it down. The fascinating thing for me is that the smallest piece has the
most limitation and ultimately is the reason for a very interesting solution. I
found 2 "almost there" solutions with single holes visible through the entryway
and I got stuck for quite some time at this point. I then went to Burrtools in
desperation and found that it was unable to find a solution which means
something special. I relaxed my rules and started again - it took me another
whole day of play to find the solution with a wonderful Aha! moment. This is one
of Alexander's best designs - make sure that you find all the near solutions as
well as the correct one.
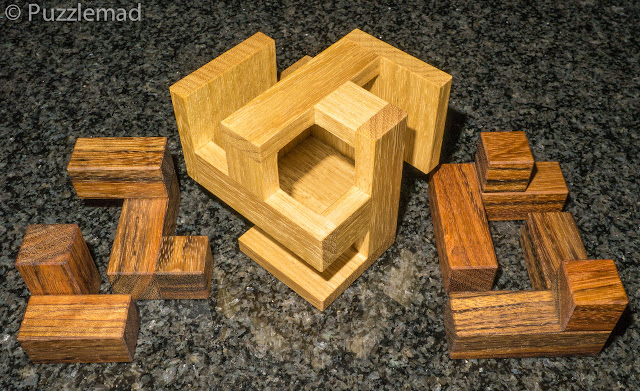
Hooks

|
|
Bubinga & Cherry
|
|

|
|
Wenge & Cherry
|
|
Hooks by Alfons Eyckmans
I am always delighted when a Pelikan release includes something from Alfons
Eyckmans. There are two versions of this beauty - one made from Wenge &
Cherry and another from Bubinga & Cherry - they are gorgeous! Alfons is the
absolute master of interesting burr design. Many people are not keen on burrs
and cannot understand why I (or anyone else) love them. I always say that it is
like exploring a maze that changes as you work your way through. Often there are
hidden pathways that are tough to find and sometimes blind alleys or loops. I do
agree that many of the very high level burrs are beyond most human's abilities
to follow but this is where Alfons is a master...the designs are always
interesting and fun to explore. The Hooks burr is one of my favourite types - a
caged 6 piece burr which takes the idea of a standard burr and extends it. The
cage is incomplete being formed from 4 "hooks" on a base and looks like it
should not make a huge difference. The pieces are 3x2x7 voxels which allows for
much more interesting interaction. There are a few moves possible early on and
no long blind alleys. Quite quickly some complex fun compound multi-piece moves
occur and this opens up even more possibilities. Process seems swift until
suddenly it's not. After 11 moves, I was stuck and could find no way to
progress. I must have either missed something along the way or be missing
something crucial to progress on my existing path. I got stuck here for a few
hours going back and forth - at least it was creating a muscle memory to help
with the reassembly. With only 6 pieces and such an open frame/cage it is
possible to see inside the maze quite well. Eventually after multiple failed
attempts I realised that I had left a single piece in the wrong position and it
had blocked the next move. Having worked that out, the progression was fast and
fun and the first piece was removed after a total of 18 moves. The remaining
pieces remain stable in the frame for the rest of the disassembly.
Having spent so long searching for the pathway, I was able to reassemble it
without help but making a Burrtools file is always fun. I think that most burr
aficionados should be able to reassemble this without help.
3 Piece Burr Flower

|
|
Wenge & Jatoba
|
|

|
|
Wenge & Limba
|
|
3 Pice Burr Flower by Osanori Yamamoto
This stunning design by Osanori Yamamoto has been beautifully created by Pelikan
in Wenge & Limba or Wenge & Jatoba. As the name states, it looks like a
flower on each face of the cube structure but it has been made from 3 rather
complex burr sticks which interlink with each other inside the cube. Once you
have found the first piece to move, the pieces then slide on each other and the
flower opens up to reveal the interior. Over a rather delightful 6 move sequence
the pieces get further and further apart until the first one comes out and then
the other two can be separated. It is not terribly hard to find that sequence
but then the real challenge begins - can you put it back together after
scrambling the pieces? There are only 3 pieces and the way they fit together at
the end looks straightforward but it took me a good hour to find the correct
order and position for the pieces to fit back together. This is a very clever
puzzle utilising what feels like a knot inside the faces to control the
movements.
Waltz
|
|
Waltz by Osanori Yamamoto
|
Another fabulous design by Osanori Yamamoto, stunningly visualised in Wenge,
Maple and Zebrano. This one is almost as if Osanori-san has seen the wonderful 3
piece challenge by Alexander Magyarics and said to himself: "I can beat that"!
It is another packing puzzle with a limited entrance and a requirement to block
the entry once solved....but this time, just to make it even more interesting,
there are only 2 pieces to be packed in the 3x3x3 cavity and filled the 2x2
entrance. Not only are there only 2 pieces but it quickly becomes apparent that
one of them
HAS to be the entry blocker. I was rather over-confident with
this one and thought it would be relatively easy. Oh no! it wasn't easy
for me! I spent a day failing completely and did wonder whether I was going
about it wrong - I looked at the name and thought about the cardinal feature of
the Waltz and then decided to explore rotational moves. I was successful and
managed to assemble the puzzle with the entry filled but something didn't feel
right. This was especially true when I found that I couldn't take it apart!
Aargh! In a bit of a panic, with a fair bit of dexterity and swearing, I was
able to unravel what I had done and decided to try again the more conventional
way. But this time I was determined to think© about the name as well but not be
so stupid. The cardinal feature of a Waltz is rotation with minimal rise and
fall. The 18 moves to achieve the assembly are a masterpiece. The gauntlet has
been thrown down and is there anyone who can design something more simple with
more beautiful moves than this? Over to you Alexander-san!
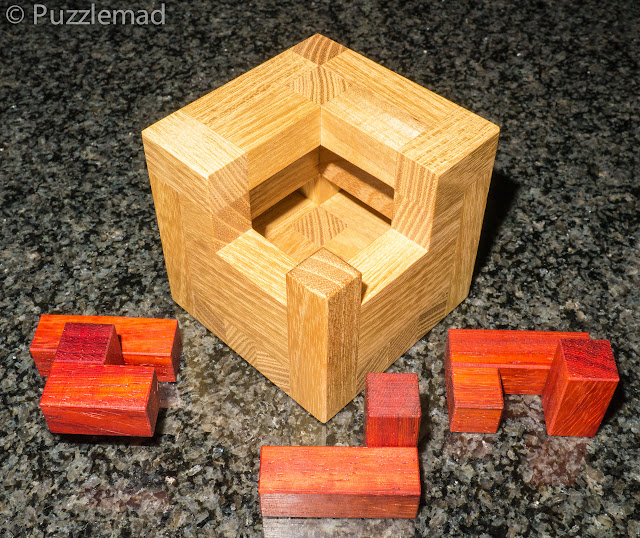
Gem

|
|
Gem by Osanori Yamamoto
|
This gorgeous gem of a puzzle by Osanori Yamamoto is simply stunning made
here from Purpleheart. I have
previously bought and solved this in April
where it was an extra puzzle that I chose to "make up the postage" from Japan!
Osanori's version was a gorgeous creation and Pelikan have lived up to the same
very high standards. When I bought the original, Osanori-san told me how pleased
he was because it was his favourite puzzle.
The original was sent out as an assembly puzzle but this one arrived
already assembled. Either way, it is a fun puzzle to explore. If you are good at
assembly then it might be a good idea to get someone to dismantle it for you
before you play. It consists of 3 rings of wood that are interlocked and
inserted into slots in the cube with one at 90º to the other 2. When
disassembling it the sequence it is fun that you cannot see the shape or how the
rings are interacting inside the cube. The sliding of the pieces over each other
shows off the extreme precision that this has been made with. Having taken it
apart, leave the pieces scrambled for a while and then try it as an assembly
puzzle
The solution took me only about half an hour but again a lovely aha! moment
made better by the silky smoothness of the pieces and how they glide over each
other. I could see why this was one of Osanori-san's favourite puzzles. It is
delightful. Another piece of Japanese puzzling heaven.
Den 3
|
|
Den 3 by Osanori Yamamoto
|

In this packing puzzle designed by Osanori Yamamoto the aim, as usual is
to assemble the pieces (3 of them this time, made from Padauk) into the nice
chunky Acacia box. I must point out the incredible detail that Jakub and team
have put into the box - Acacia is a relatively plain wood in terms of colour but
with having very nice grain and shading. To make this one even more spectacular
the top and bottom faces have been assembled with a diagonal line of differently
placed cubes of wood - this makes this wonderful puzzle even more precious for a
man addicted to gorgeous wood! The cavity of the box is the usual 3x3x3 cube
but, with this one, the areas that must be occluded by the pieces are quite
extensive over quite a lot of the puzzle which should limit the number of
possibilities to go through. I used Burrtools to count the possible assemblies
after I solved it and there are 124 ways to assemble a cube from the 3 pieces of
this puzzle but when restricting the positions to allow the occlusion of the
holes, this number shrinks down to a more reasonable 22. This number is still
too high for me to go through and try them all (I find that I can't remember
what I have tried after just 3 or 4 attempts) and necessitates using the
restricted entry to significantly decrease the cubes to be tried.
The solution of this took me an embarrassingly long time to find. I think I
played with this on and off for 4 or 5 evenings before I found a cube that met
all my criteria and then really struggled to place the pieces inside the box.
I ended up solving it outside the box starting from cube shape and attempting
all the moves that should be possible and gradually dismantled the cube. It
should not be that difficult with just 3 pieces but I kept getting stuck 10 or
12 moves in. The disassembly of this puzzle has an incredible level 26
(19.4.3) - if you do manage to solve this then you can be very chuffed at your
puzzling prowess.
Tigridia
|
|
Tigridia by Alexander Magyarics
|
The final puzzle I played with in this new batch was Tigridia by the amazing
Alexander Magyarics (last, mostly because my initial play revealed it to be a
very difficult challenge). Beautifully made from Limba & Ovangkol, it
consists of 4 pieces to be placed as a 3x3x3 cube inside one of the most complex
boxes I have seen in one of these puzzles. The entryways are very limited but
there are 3 of them to be used. There are lots and lots of holes in the box
which need to be covered by the final filling. Your usual approach outside the
box quickly reveals that there are a LOT of possible cubic assemblies (Burrtools
later told me that there were 64) and obviously each one that you find will need
to be tested in every possible orientation. I very quickly got quite confused
and lost track of what I had been trying. Most of my potential assemblies, when
I found one that also fit the brief to cover the holes, quickly revealed
themselves to be impossible to move inside the box and could be discounted.
After a couple of days trying and a deadline to hit, I went to Burrtools to at
least give me the correct cubic assembly and then I could work out the method to
place it inside the box. Even this proved to be a problem! I had the correct
cube made but I really could not work out how it could be inserted inside the
box, After a very frustrating and then satisfying hour, I found the critical
move and it was something rather special that is only possible with a box with
this many holes in it. The Aha! moment is wonderful when you find it but that
might well take you a VERY long time.
I am rather humbled by the fact that Ivan Danik (the
Puzzle Guy on YouTube) managed to solve this one and did not find it terribly difficult! I found
this one amazingly hard. I agree with him that the frame is stunning!
Pick what you love guys and get them all tomorrow (6th November at 10am
central European time) at the
Pelikan store