Sunday 30 October 2022

Stealthily Lined Up by Alexander

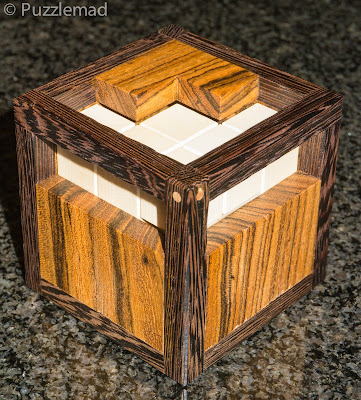
Stealth by Alexander Magyarics (made by Brian Menold)
It's my birthday today (no I am not saying how old but it's an embarrassingly high number) and I am not using it as an excuse not to post on the site. I would have hoped to have something written in advance but I didn't manage to solve anything until yesterday because I am rubbish at puzzles and these were a bit of a challenge for an ageing puzzler like me.

I haven't bought anything from Brian for a while. Mostly that is because he has been living a real life and enjoying himself which has meant less puzzles produced and also because the few that he has been making recently were already in my collection. However, a couple of weeks ago he showed off a few new ones that were released and rapidly snapped up by me and lots of other delighted puzzlers. This sneaked across the pond very quickly and through the customs without raising an eyebrow or a bill and even managed to get into chez Sadler despite frequent Royal mail postal strikes.

The first one (pictured above) was another fabulous packing puzzle by the incredibly talented Alexander Magyarics (someone I am lucky to chat with on a regular basis and consider a friend). When Alexander produces yet another of these packing puzzles I almost always jump at the chance. They invariably have only a few pieces to place but the requirement to leave no visible holes and the interesting piece shapes makes for a really fun challenge. I am less keen on the packing puzzles with lots of pieces because of the random trial and error nature of the puzzling. When there are so few pieces and with complex shapes and other constraints, this forces the puzzler to use thought© and logic to solve them. I was not let down with this one at all.

It is absolutely gorgeous made with a Wenge and Bocote box and having beautiful bright white Holly pieces. It is chunky at 3" in each direction and surprisingly heavy. This was the one I started with because it looks the most solvable by me whilst tired and not good at puzzles. The disassembly level is 11.2.2 meaning that the final insertion was going to be fairly tough to find. As usual, I worked outside the box and found several shapes that would meet the assembly criteria but mot of them could be quickly excluded as requiring rotations to get them past the limited opening of the box. I settle on one that looked good and proceeded with logic and thought and ignored Mrs S laughing at my muttering. She finds it funny that I can't think without muttering to myself! I got stuck for a while as I could not find the correct move and when I thought I had found the removal sequence, I could not remember it for long enough to reverse it! Eventually, I learned the sequence in reverse and managed to place all the pieces. I hate to think about what other facts I have pushed out of my feeble brain in learning something new!

Everything in place
I admired it like this for a while and left it overnight and then couldn't remember the disassembly. Taking it apart required me to visualise what was happening inside and was also fun. This could be an assembly puzzle for some and for less experienced puzzlers, just as good as a disassembly puzzle.

Line Up
How gorgeous is that? This boxed burr puzzle is also designed by Alexander and made by Brian. I chose the Mansonia box with the Chakta Vita and Holly pieces. I particularly loved the checkerboard top and bottom face as well as the lovely curved corners of the box. This is another relatively "simple" design with just 4 pieces to remove and replace from the square tube box. The level (24.3.4.2) is getting up quite high but because there are only 4 pieces, it is perfectly doable for an average puzzler and very much an enjoyable exploration.

I started work on it during the week and found a lovely little starting sequence with only a few blind pathways off the main one. Unfortunately, I struggled to advance more than about 10 or 12 moves before finding myself back at the beginning or stuck with nowhere to go. I was missing a turning somewhere. I played every evening this week whilst watching TV with Mrs S and kept going around and around in circles. What was I missing? During the disassembly the pieces get very well separated but still linked together and it is easily possible to see inside. Despite this, I just could not spot the required pathway. Finally yesterday, I spotted something and tried a new move which opened up a new set of pathways. From this point on the solution is logical but still a bit of a surprise in the direction that the pieces come out. I had my 4 pieces for the photo:

Line up with pieces lined up
I was almost certain that I would need Burrtools to reassemble the puzzle after that (especially as I had scrambled the pieces up for the photo) so I just left it for a couple of hours until a suitable time to get to my computer. It kept calling to me, though and I couldn't resist picking it up and trying to assemble it from scratch with only a very hazy memory of the solution. I wondered whether the checkerboard might help but, surprisingly, it is of no significance at all. The pieces cannot be assemble incorrectly and the placement of them within the box is very logical indeed. I tried a few alternatives and it was immediately apparent that it is impossible to place them incorrectly. Having worked out the placements, the actually assembly was quite fun and did not take me much more than 30 minutes. The cat was unimpressed when I shouted and showed him what I had done and Mrs S just rolled her eyes.
If you get a chance to play with these then go for it, they are beautiful, tactile and designed at just the right level for a puzzler to solve in a reasonable period of time. Even I solved one in an evening! Thank you Alexander and Brian.


One of my friends (Ross) on Facebook asked about buying some of my Jerry McFarland puzzles from me. I haven't yet ever sold a puzzle (I cannot stand the thought really) but it did make me think about how many I had accumulated from the master. I brought them down yesterday and took a photo. It was so impressive that I thought I would share it with you:

Now that is something to be proud of!
and lets not forget the rather special Caramel case that he produced as well in very limited numbers:

I cannot resist a burrset! This is the 42 piece burrset
Now those definitely take pride of place in my collection!

Sunday 23 October 2022

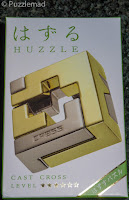
Hanayama Cast Cross

Hanayama Cast Cross - man, these things are tough to photograph!
Every now and then after a chat with my wonderful talented friend, Frederic Boucher, he decides that I don't have enough puzzles and he spontaneously sends me a lovely (not so) little care package containing a bunch of his new creations and others that are available only in Japan. Luckily he doesn't speak to Mrs S who has completely the opposite opinion and who would very much prefer it that I don't order any more. Luckily she who must be flinched from has spent the last week up in Edinburgh visiting the outlaws which allowed to me receive a new pair of toys as well as my bunch from Frederic without her seeing the sheer size of the packages. I hope that she doesn't get to review the Ring camera video footage and realise that I have been very baaad! Do I dare tell "her" about the new twisties I have recently ordered? Gulp!

Amongst the lovely package of toys from Frederic was the new Hanayama Cast Cross. I had fiddled with it idly at the last MPP and realised that despite the Hanayama 3/6 (PuzzleMaster 7/10) difficulty rating, this was not going to be one that I would solve really quickly and having realised that the movements needed to be very precise, I decided to wait until I had my own copy. I was delighted that Frederic saw fit to give me one (he's so so generous). 

Having unpacked my parcel and stashed them where Mrs S wouldn't notice (have I told you before that I haven't tidied my study in over 5 months?) and I set to playing with this one on Wednesday whilst attending a virtual conference (these are a wonderful new thing since Covid started - if you are a home-body like me then these are fab!) I idly fiddled with my new toy whilst watching a talk. I quickly realised that the two pieces of this puzzle are almost identical apart from one key feature. This is effectively a disentanglement puzzle using chunky metal instead of wire. It is rather satisfying to play with. The first move is nice and linear giving me the expectation that all moves would be using the rectilinear grid, including rotations to get the pieces to end up with 90º position changes. However, after the first move it became apparent that this was not quite so simple - the end positions are always at 90º from the start of a move but to achieve each position change requires very slight angulations to get the bulkier sections of each piece past obstructions. The moves need to be very very precise. This frightened me a little as my usual to and fro technique often resulted in me really struggling to undo a move or sequence. At one point during my exploration I tried to turn a piece in a particular direction and it seemed to be blocked. Stupidly I put a tiny tiny bit of force on it and it clicked past the obstruction allowing a whole bunch of new moves which didn't seem to help me. It had perturbed me that this had used force (albeit only a minuscule amount) so I thought I would backtrack again and realised I couldn't do it! Aaargh! Panic ensued and I had to put it down until the lunch break in the conference as I couldn't concentrate on both at once.

When I did return to the Cross, I spent a good ½ hour on it before managing to undo my stupid earlier move. Having learned my lesson (I can learn something once in a while but it has probably made me lose something else more crucial - there is not much room in my tiny brain!) Having got back to the beginning, I started again but tried to move in the opposite direction. The crucial move proved tough to find but I got there and after that managed to separate the pieces:

Finally! It took me a good hour or two
As you can see, the pieces are almost identical - only one has the required gap to allow them to be separated. I left the pieces for the rest of the day before reassembly which then took me another hour having forgotten the moves.

This is a really nice design by Edi Nagata who also designed the Cast Coil which was one of the first Hanayama puzzles I ever attempted and reviewed way back in 2011. Both are beautifully designed requiring a fun and well hidden sequence of moves. I think that the Cast Cross is probably the same difficulty as the Cast Coil (rated as 4/6 Hanayama and 8/10 Puzzlemaster) and I would tend to disagree with the difficulty rating for the Cross and increase it by one point. It is definitely one that should be in your collection. I would suggest that it probably should not be handed to non-puzzlers to play with because if forced then it may be irrevocably locked up.


Sunday 9 October 2022

Kumikisaurus Made a Fool of Me on MS Teams!

Is it a bird? Is it a plane? No it is a Kumikisaurus!
Juno describes this as:
"This 9-piece dinosaur-shaped puzzle offers unique solutions for levels 10-13. That is, it takes 10 moves to remove the first piece from the assembled shape and another 13 moves to remove the second piece. It is a relatively easier puzzle compared to many of Juno's diabolic burr puzzles, yet it is still challenging to solve. Some of the pieces are shaped in such a way that it is obvious at a glance which parts need to be assembled where. The difficult part of the challenge is in which order the pieces have to be assembled.
The puzzle is shipped to the customer incorrectly assembled, so it must be disassembled and reassembled to form a perfect dinosaur shape."
It is 173 x 76 x 100mm, made from 9 pieces of Queensland Silver Ash. How could I resist?

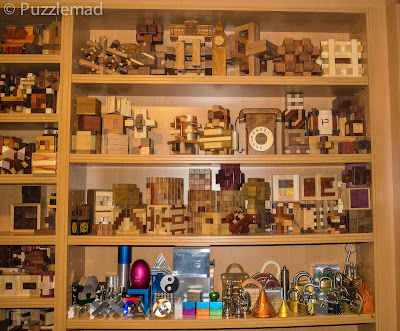
As a fairly senior doctor (that means bloody old), I chair quite a few meetings for my organisation - they used to be in person but since the pandemic began they are almost all done via MS Teams (an abomination of a program but mandated by my employer). My aim in these meetings is to ensure that the various bits of equipment and consumables the wards and operating theatres can order and get sent are compatible and fit for purpose. There is a lot of work that goes into the background activities of running a major hospital. Now, many of these meetings are pretty niche and not terribly exciting (unless we are spending a LOT of money on new toys) and so I brighten the dullness up by setting my background as a view of my study (it is actually in front of me) and use an old picture showing a small fraction of my collection which many colleagues are astonished by.

Just one of the varying backdrops on MS Teams
A bit of a distraction!
I have to use an old picture because I have turned the study into a huge mess by not putting anything away for the best part of 9 months and Mrs S knows it! Whack! Ouch! The picture lightens the mood in a meeting before we have to get on with our real work. We also have our departmental educational and service meetings using the same system often attended by over 150 colleagues and associated paramedical staff. They know me and my "foibles/madness" and just look in amazement. If the meeting is not terribly interesting and I start to doze off (embarrassing in a video conference) then, to prevent it, I often start to play with one of my toys. Apparently I was a huge distraction during one conference when I spent a good hour solving the Skewby copter plus whilst being watched by everyone else who was supposed to be listening to a talk. I had completely forgotten that my video was still switched on after I had presented my bit. Whoops!  

Let's just say that Juno's latest creation had arrived and I might have done the same thing. Except this time I might just have made a fool of myself. That be would be another whoops! A couple of weeks ago Juno announced the imminent sale of his latest burr creation the Kumikisaurus. This is "obviously" a Kumiki puzzle of a dinosaur and it is very reminiscent of the collaboration with the fabulous Brian and Sue Young (MrPuzzle) in the creation of the wonderful Kumiki Airlines puzzle that I reviewed here.

Like the Kumuki airlines puzzle, the Kumikisaurus is sent out in an incorrect assembly (as pictured above) and whilst playing on screen, I received a couple of text messages to the effect of "nice bird" and I indignantly replied that it should be a dinosaur. Then my cat wandered through the camera view and I received a chorus of "nice pussy" comments which I sheepishly had to agree with. I sometimes think that my workmates have very poor attention spans...rather like me. 

During the proceedings, I explored the disassembly of the bird/pterodactyl and had a thoroughly nice time (I was still attentive to the discussion) as I gradually removed the first two pieces which required quite a lot of moves in a wonderful logical sequence. I then got a bit stuck trying to remove the third and found it very suddenly without expecting it when a couple if sticks fell out into my lap in front of the watching audience. I must have reflected the shock on my face inadvertently as someone noticed it and sent me a derisive text message. Blush! I then spent another 30 minutes during the meeting desperately trying to put it back together and back to the beginning. After a struggle I managed it and in relief put the puzzle down and stopped playing for the rest of the afternoon meeting. 

Back to play later that evening and I managed to disassemble it and was happy that I had sort of learned the approach:

9 Pieces of dinosaur
Having taken it apart, the challenge is to reassemble it in the correct shape so that it looks more like a Brontosaurus than a Pterodactyl. Now I am usually awful at assembly puzzles and fully expected to have to resort to Burrtools to solve this. Luckily, due to the shapes being relatively simple and with the top and bottom surfaces of the dino body having chamfering in the correct positions, the placement of many of the pieces were quite restricted. I set to, trying to find the placement that might work with the top section missing. I found a few possible assemblies with the top section off and tried to imagine the disassembly moves from the start and very rapidly realised that most are impossible. Having limited my possible positions, on my third attempt I found a series of piece placements that would allow me to begin a disassembly process. Despite having an awful memory and being truly rubbish at burr assembly, I managed to put it together in about an hour. This was awesome fun!

I actually assembled a burr from scratch!
Dinosaur shape at last.
I will still make myself a Burrtools file because that is half the fun with these things and prolongs my enjoyment of the puzzle. This puzzle is unfortunately sold out now but quite a lot were made. I am sure that one will come up at auction and it is worth getting a copy (don't pay a huge amount as it really is a relatively straightforward if fun challenge).

Thank you Juno! I loved it and it will end up on display in a prominent place once I finally get working on my study!


Sunday 2 October 2022

It's Easy But Very Hard!

David Pitcher's 4 Corners Cube
Named this way because only 4 corners can be moved - notice that the top front corner is fixed
Back in May I bought a bunch of twisty puzzles that had been released in the previous year that I had been fascinated by and I felt the "need" to catch up (yes, I told Mrs S that I needed them!) I was particularly interested in the 4 Corners cube which was a design by the incredibly talented David Pitcher who I had been delighted to meet at the Paris IPP. I was amazed that he designs these incredibly complex puzzles and has them 3D printed and yet does not solve them. He understands geometry and yet cannot solve twisty puzzles. I, on the other hand, studied Geometry in some the Open University courses but never got to understand the sort of shapes that David deals with. Like him, I struggle to solve them as well.

The 4 corners cube was mass manufactured by Lan-lan and they did a superb job. This puzzle moves and works beautifully. My initial interest (beyond owning one of David's creations) was because I absolutely adore edge turning puzzles and the jumbling/shapeshifting that goes with them:

Edge turning and jumbling
This photo was taken after just 2 moves and you can see the shapeshifting and immediately see something that frightened the Bejeezus out of me! Firstly, it isn't really an edge turner...it's a sort of corner and edge turner together. This means that my feeble bwain is going to get very confused when it starts to move and, second, the split between edge and corner is aligned in such a way that it blocks subsequent moves - it bandages. Aaaargh! For this reason, I had it in my work bag with me for 4 months and did nothing more than fiddle. It was fearsome. 

I did realise that simple 3 cycles would be possible and this might be useful but after working this out, I could not see any way that this might be helpful. I put the bloody thing down again! Time to Think© but Allard wasn't going to be any help here.

I could see that using setup moves I could 3 cycle the centres into more or less wherever I wanted them to be but how was this going to help with all the other pieces? It wasn't going to be a very fun challenge if all I dared to do was scramble the centres. I took the puzzle with me up to Edinburgh with the intention of spending some decent time with it while not having to work but again it frightened me to death and I got side tracked by the fabulous Akaki Picnic basket puzzles.

Bring up bottom edges
Perform 3-cycle
Move edges back
After a bit more study, I realised that I could 3 cycle the edge pieces along with the corners as shown above. It just needed the correct setup moves again. I was making some major thought breakthroughs just by idly fiddling and trying just short sequences at a time.

Having found the above cycle, I had an epiphany - I am certain that you all will see it. Having done my cycle ending with that third picture it is clear that the top corner is now isolated and can be moved away. This means that I have found the first part of a commutator and a potential piece isolating sequence.

The second half of the commutator
Different corners but a corner 3 cycle found
Having worked this out and managed to perform it several times I was ready for a scramble! Except it is not an easy cube to scramble. It gets blocked up very quickly. I had to do setup moves to scramble edges and corners properly without getting blocked and then only at the end of a bunch of these could I just let lose and randomly turn. It got progressively harder to find sections that would actually turn properly or even at all. I (actually, David) had created a monster:

That was a very silly thing to do!
I seriously regretted what I had done and had serious doubts about being able to solve it. It has taken me most of this week to get to grips with this challenging puzzle. First of all, try to get the wing shapes (those that sit on either side of the centres) back into the correct orientation. This was fun but not easy - it was soooo blocked up that it was like unravelling a knotted piece of string to get it into something resembling cube shape. Once this was done then the 2 colour edges need to be placed into position and I thought this would be pretty straightforward until I found a scenario rather like this:

Here I have created it with just one edge but there may be several like this
Somehow some of the edges and corners have been positioned but flipped 180º. OMG! This is a nightmare for me! I know that it means that at least one of the centres has been invisibly flipped as well but trying to fix it is so so hard. I am sure that several of you brilliant twisty puzzlers out there are screaming at my website that it is an easy fix. But remember...my whole knowledge of how to do this puzzle is based on performing simple 3 cycles and using a pair of simple 3 cycles to move corners around. I literally have NOTHING more complex than a 4 move cycle (yes, it's a variant of my up, up, down, down system). 

I needed to fix the problem using my 4 move sequence and a whole bunch of setup moves and maybe do it several times to place things out, rotate them and place them back (often having to move them all the way around the cube in the process). I have performed this several times during multiple scrambles and have yet to actually understand a simple way to do it. I can manage it but only after multiple attempts and a LOT of swearing! Once the edges are all placed then the next step for me is centres (it could be the other way around):

Edges placed - the easy bit left to do
As I had mentioned above, placing the centres is really easy but can take a bit of setting up and then all that is left is to magically use my commutator to position the corners (easy peasy!)

What the hell is this?
All corners placed but 2 rotated in opposite directions! Aaaargh!
The first time I solved the puzzle, my corner commutator worked it's magic perfectly and I had my cube finished, let out a whoop and frightened a cat as well as annoyed the present wife! I was on a roll! Time to scramble again and see if I could master those blasted edge positioning moves (nope! still not managed it). I struggled yet again with those edges but finally got them done and expecting success, I moved my corners around boldly and sat back in disbelief. What was going on here? I had everything placed but 2 corners rotated - Nooooo! Fixing this took me several hours - as stated, I only have my 4 move 3 cycles - nothing more complex than this and I had to try and use them to take the corners out and rotate them back into place facing the right way. I have managed it a couple of times now and in the process found another variant where I all corners are in but 3 are rotated all the same direction. I can fix it but it takes me a long long time!

Should you buy this puzzle? Absolutely yes! It is a fabulous design and turns beautifully. I am sure that you will be able to solve it with much less trouble than me. The amazing thing is that it does not require anything fancy to solve it. It just needs a 4 move up, up, down, down cycle of 3 pieces used in imaginative ways. If you do it this way then it requires a lot of thought and planning but that is half the fun. If you do know of any better ways to fix the reversed edges then please let me know.

Thank you David for a fantastic challenge - I hope to get some more of your amazing puzzles soon (I am aware that there is a plus version which un-bandages the edges allowing for a much more complete scramble. I don't own this one yet but it is on my list of puzzles to buy. I need to wait for Mrs S to be away visiting the outlaws again before I order anything else! She keeps picking up sharp objects and looking at me with narrowed eyes!